How to check if your VPN is leaking DNS
Our in-house cybersecurity experts and journalists, renowned for major reports like The Mother of All Breaches, conduct transparent, unbiased VPN testing and in-depth analysis.
With 750+ articles crafted based on real-world research, we empower readers to make informed purchasing decisions through first-hand expertise.
Learn more
A VPN’s purpose is to encrypt your traffic, and to do so, it should route your DNS requests through its secure tunnel. But if something goes wrong with your VPN, network settings, or connection, your DNS requests can go outside the tunnel and reach your ISP or another DNS provider. That can reveal which domains you’re trying to visit, even if some other parts of your connection are protected.
Fortunately, as part of your cybersecurity hygiene, you can check whether your VPN is leaking DNS requests. In this guide, I’ll guide you through how to test your VPN for DNS leaks using free online tools, interpret the results, and fix any leaks you find.
What is a DNS leak?
If you want to look at DNS leaks, you first need to understand what DNS (Domain Name System) is used for. The way we, humans, access information is by using domain names, like cybernews.com, whereas browsers use IP addresses. The DNS acts as a translator, which helps both of us to interact. It converts the names of websites into IP addresses so that your device can work out which server to connect to.
When you connect to a VPN, your DNS requests should go through the VPN tunnel to a DNS server that’s used by the VPN. This way, you can prevent your regular DNS provider (like your ISP) from snooping on which domains you’re looking up.
However, sometimes, those requests bypass the VPN tunnel and reach an unintended DNS server, such as your ISP’s. That’s what’s called a DNS leak. In case of a DNS leak, your ISP might be able to see which domains you’re trying to access, even if your VPN is encrypting the rest of your internet traffic. Here’s a simple way to visualize it:
- Without a DNS leak: Your device → VPN tunnel → VPN DNS server → website
- With a DNS leak: Your device → VPN tunnel → ISP DNS server → website
I should note that DNS leaks aren’t the only type of VPN leak you might experience. An IP leak can reveal your IP address, while a WebRTC leak can expose IP information through your browser. These are separate issues, so you'll need different tests to check for them.
How to test for DNS leaks
You can easily test your VPN for DNS leaks in just a few minutes. The key is to compare your DNS results before and after connecting to the VPN and see whether your ISP or local network still appears in the results.
1. Set up your baseline (with the VPN off)
Before you connect to your VPN, check what your usual connection looks like. This will give you a baseline to compare against later. For this task, you can follow the steps below:
- Make sure your VPN is disconnected
- Go to a DNS leak testing website, for example, dnsleaktest.com or browserleaks.com/dns
- Run the Extended Test on dnsleaktest.com (or use the auto-run test on browserleaks.com/dns)
- Note the ISP names and IP addresses that appear in the results (they belong to your ISP or the network you’re using, such as at your workplace or a hotel)
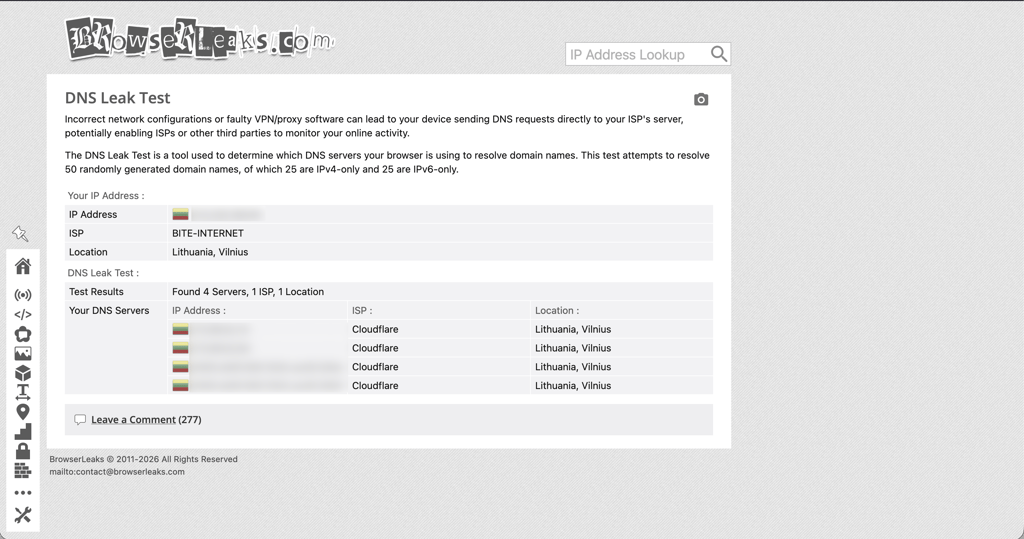
There's no need to keep a record of every DNS server that shows up. All you need to remember is which ISP or network handles your DNS requests when you're connected and not using a VPN.
2. Connect to your VPN
The next thing to do is to open your VPN application and connect to the server of your choice. Wait a few seconds and then check if the VPN indicates that you’re connected. After that, turn on the kill switch so that your device can access the internet only via the VPN tunnel.
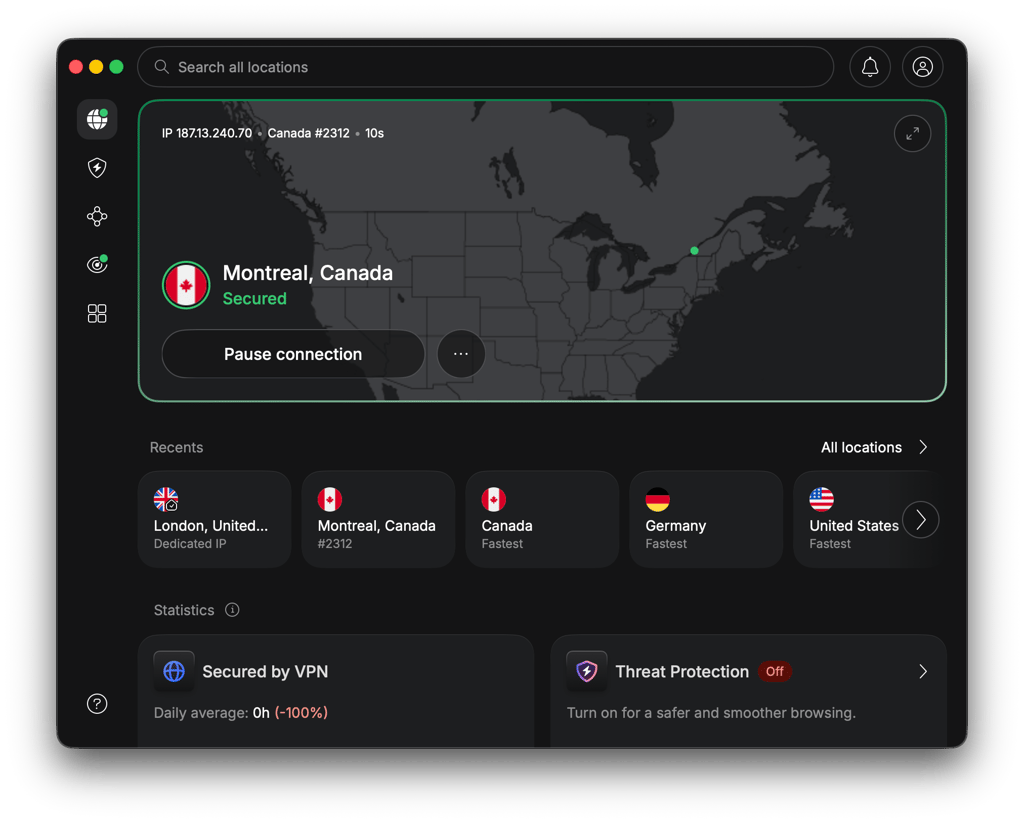
3. Run the Extended Test again
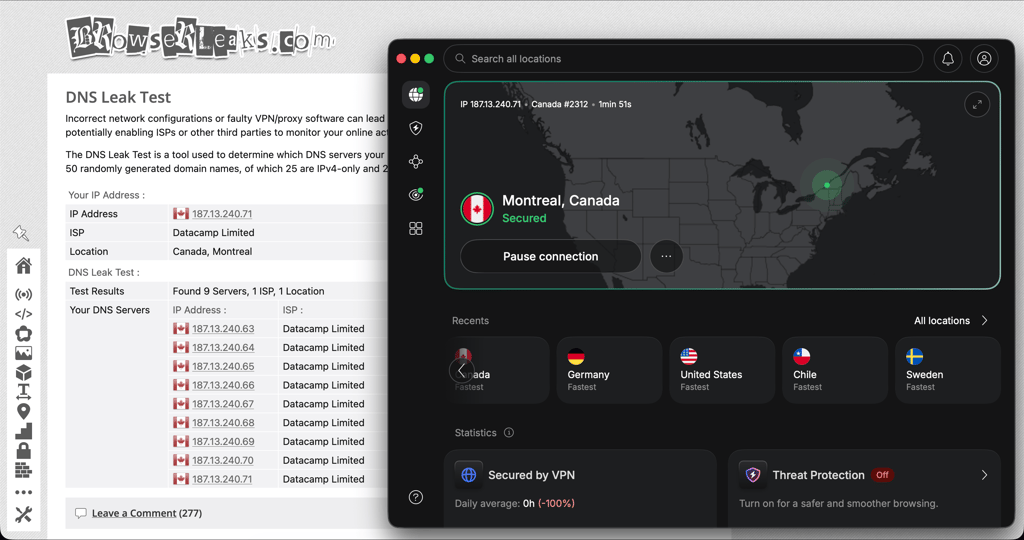
After you have connected to your VPN, go back to the DNS leak testing website and run the test again. When using DNSLeakTest.com, I suggest selecting the Extended Test since the Standard Test runs only a single round of queries. The Extended Test can yield more reliable results, as it runs multiple rounds of queries and thus reveals any secondary or fallback DNS servers that would otherwise go undetected.
4. Analyze the results
When you have DNS results from before and after connecting to the VPN, you can compare them. The elements you should look for are the DNS server IP addresses, provider or ISP names, and server locations, as well as the IP address and location assigned to you by your VPN provider. Here’s how to interpret what you see:
- No signs of a DNS leak. If the listed servers belong to your VPN provider or to a secure third-party resolver that the VPN intentionally uses, your DNS is secure. There shouldn’t be any signs that your regular ISP is still handling your DNS requests.
- Possible DNS leak. If you still see the same ISP names from your baseline test or details from your local network while the VPN is connected, your DNS requests may still be going through your regular connection instead of the VPN.
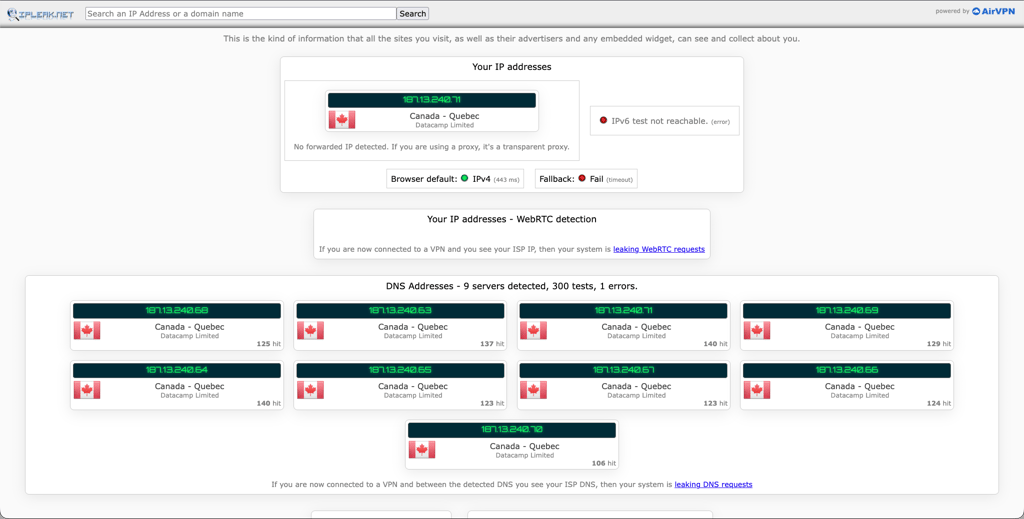
Keep in mind that the DNS server IP doesn’t have to match the IP address assigned by your VPN provider. VPN providers often use separate DNS servers, so what matters is whether the DNS servers belong to your VPN provider or a third-party resolver that the VPN has configured.
How to fix a DNS leak
If your test reveals that your DNS requests are being routed through your ISP or local network while the VPN is connected, there are a few fixes you can try. I recommend repeating the DNS leak test after working through the steps below to see if the problem has been resolved.
Enable your VPN's kill switch
Most premium VPN providers include a kill switch feature, which can help prevent your device from sending traffic outside the VPN tunnel if the connection suddenly drops. Usually, you can find it in your VPN app’s settings. Enable it before reconnecting to the VPN and run the DNS leak test again.
It’s important to understand that a kill switch doesn’t directly fix a DNS leak while the VPN is connected. It works more like a prevention measure that ensures your traffic doesn't fall back to your regular connection if the VPN disconnects unexpectedly.
Flush your DNS cache
Sometimes, a device might continue using DNS information from before you connected to the VPN. Flushing the cache clears these stored records and forces your device to make fresh DNS requests the next time you visit a website. Note that the command differs depending on the operating system you’re using:
On Windows
Open Command Prompt as Administrator and run:
- ipconfig /flushdns
You should see a message confirming that the DNS Resolver Cache was successfully flushed.
On macOS
Open Terminal and run:
- sudo dscacheutil -flushcache; sudo killall -HUP mDNSResponder
You might be asked to enter your administrator password. Unlike Windows, macOS doesn’t display a confirmation message once the DNS cache is flushed.
On Linux
For Linux, the command depends on the DNS service you use. On systems that use systemd-resolved, run:
- sudo resolvectl flush-caches
On older system versions, use:
- sudo systemd-resolve --flush-caches
If your system uses dnsmasq or nscd, restart the service instead:
- sudo systemctl restart dnsmasq
To check which resolver is running, use systemctl status systemd-resolved. After flushing the cache, reconnect the VPN and repeat the DNS leak test.
Check your device's DNS settings
If your ISP's DNS servers continue to appear, check the DNS configuration of your VPN's virtual network adapter, such as TAP/TUN or WireGuard. Custom DNS settings can interfere with your VPN's DNS configuration, so remove any manually configured DNS server or set it to Automatic.
After changing the settings, reconnect to the VPN and repeat the DNS leak test.
Check your VPN's split tunneling settings
Many premium VPNs include Split Tunneling, Bypass VPN, or Excluded Apps features that route selected apps outside the VPN tunnel. If your browser or entire device is excluded, its traffic can bypass the VPN regardless of your other settings.
Open your VPN's split tunneling settings and make sure the browser you're testing isn't on the excluded list. If you don't need split tunneling, disable it and run the DNS leak test again.
Some VPNs also let you exclude specific destinations or networks, so check any per-network or trusted-network rules as well.
Disable or configure IPv6 settings
Some VPNs fully support IPv4 but don’t tunnel IPv6 traffic. This can leave your IPv6 address or DNS requests exposed outside the VPN.
First, check whether your VPN has IPv6 leak protection. If it’s available – enable it. If your VPN doesn't support IPv6 tunneling, you can temporarily disable IPv6 on your active network adapter, then reconnect to the VPN and test both IPv4 and IPv6 again.
Check Secure DNS or DNS-over-HTTPS
In some cases, your browser might use DNS-over-HTTPS (DoH) or its own Secure DNS provider – not the DNS resolver configured by your VPN. Depending on your setup, this can cause the browser to send DNS requests outside the VPN's intended DNS configuration.
To fix this, check your browser's Secure DNS or DNS-over-HTTPS settings and temporarily disable the feature or configure it to work with your VPN. Then run the DNS leak test again.
Prevent WebRTC leaks
A WebRTC leak isn't technically a DNS leak, but it can expose your IP address through your browser even when a VPN is active. If you want to check for WebRTC leaks as part of a broader VPN leak test, you can take the following steps:
- Disable WebRTC in your browser if it offers this option
- Check your browser's privacy settings or use a trusted WebRTC-control extension if needed
- Use a VPN with WebRTC leak protection
- Run a WebRTC leak test to check whether your real IP address is exposed
If the test shows your VPN's public IP address rather than your real public IP address, your VPN is generally protecting your IP address as intended.
Restart your VPN and network connection
If you’ve tried all the steps above and you’re still seeing the same DNS servers, the issue might be lying in your VPN and network connection. Here’s what you can do:
- Disconnect the VPN
- Close the VPN app completely
- Disconnect and reconnect to Wi-Fi or Ethernet
- Reopen the VPN app
- Connect to a different VPN server
- Run the DNS leak test again
These steps can address temporary routing or DNS configuration issues. Connecting to a different server can help you see whether the issue is specific to one server.
Update or reinstall your VPN
Outdated software might contain networking bugs or might not correctly configure the operating system’s DNS settings. Therefore, it’s crucial to update your VPN app whenever a new version is available. If the problem continues, reinstalling the VPN app can reset its virtual network adapter and DNS configuration.
FAQ
How do I know if my VPN has a DNS leak?
To check whether your VPN has a DNS leak, you should run a DNS leak test. For this task, set up your baseline, connect to your VPN, perform the test again, and compare the results. If your ISP’s DNS servers show up instead of those associated with your VPN or configured DNS provider, your connection might have a DNS leak.
Can a DNS leak happen when my VPN is connected?
Yes, a DNS leak can still happen even when your VPN is connected. This happens if your DNS requests are still being handled by your ISP or local network. Running a DNS leak test can help you see if your DNS requests are being routed as intended.
Does a DNS leak expose my IP address?
No, a DNS leak doesn’t necessarily expose your IP address, but it can reveal your DNS requests to your ISP or another third party. Your actual IP address can still be hidden by the VPN, even if your DNS traffic is leaking.
How do I stop a DNS leak?
There are a few ways you can fix a DNS leak. However, I recommend first running a DNS leak test after connecting to the VPN to identify the source of the leak and determine whether your DNS requests are being routed through the VPN as intended.