How to deploy OpenClaw with Docker: step by step
Our in-house experts conduct independent, hands-on testing and transparent reviews of VPS hosting providers by using real server environments, and industry-recognized benchmarking methods to ensure impartial and evidence-based assessments
Using the same criteria for all VPS services, we share our detailed methodologies and testing practices to help customers compare performance, reliability, scalability, and overall value before choosing a virtual private server.
Learn more
Many teams have faced the frustration of deploying applications to a VPS, only to run into dependency conflicts, broken upgrades, or unstable environments that waste hours of troubleshooting. Docker offers a way out by letting you create a reproducible, production-ready OpenClaw deployment that works reliably on any VPS, not just locally.

In this guide, I will walk you through deploying OpenClaw using Docker and Docker Compose, with a focus on real-world production needs. I’ll explain how to set up Docker on your VPS, configure Docker Compose for OpenClaw, and apply best practices for production environments. I’ll also cover critical infrastructure considerations, including security, scaling, and maintenance.
What is OpenClaw?
OpenClaw, formerly known as Moltbot and Clawdbot, is a free, open-source, self-hosted AI agent platform for executing tasks, managing files, and web crawling. It can interact with a variety of applications like email, calendars and files. You can manage OpenClaw via messaging apps such as WhatsApp, Telegram, or iMessage.
To work properly, OpenClaw does require an API key from your chosen AI model – OpenClaw recommends Anthropic’s Claude. Further, you can run OpenClaw either locally (on your own machine), on a server that you control, such as a VPS or cloud server that you rent from a hosting provider, or in Docker.
Why use Docker for OpenClaw?
Docker is a good choice for running OpenClaw because it simplifies setup and ensures consistency and environment independence. Since OpenClaw and all its dependencies are within one Docker container, there is no need to manually install libraries or resolve version conflicts on different systems. This means you can run OpenClaw the same way on any machine, whether it's your laptop, a server, or a cloud platform.
Docker also makes it easy to share your OpenClaw environment with others. If you need to collaborate or move from development to production, you can do so without worrying about differences in operating systems or software versions. This reproducibility is especially valuable for research, testing, and scaling OpenClaw across multiple instances.
What system do you need to deploy OpenClaw?
Here are the minimum and the recommended system requirements for deploying OpenClaw on Docker:
| Minimum | Recommended | |
| CPU | 1 vCPU | 2 vCPU |
| RAM | 2GB | 4–8GB |
| Storage | 2GB SSD, NVMe SSD | 2GB or more NVMe SSD |
| OS | MacOS, Linux, Windows via WSL2 | MacOS, Linux |
Keep in mind that system resource requirements depend heavily on your projects and what processes you want to run. Docker has no explicit system resource requirements, but it is known to be quite heavy – although you can always set usage limits. OpenClaw resource usage also depends on your projects, but technically 8GB RAM and 1 vCPU should be enough for 24/7 runtime.
If you are hosting Docker on a VPS, KVM virtualization is required. Therefore, shared hosting is not a viable option for using Docker for OpenClaw.
Generally, it is recommended to install OpenClaw on VPS or cloud servers rather than a local device, mostly for easy setup and maintenance. With local deployment, you do require some maintenance and configuration expertise. The plus side of running OpenClaw locally is full control over your data.
One-click OpenClaw setup
Before going all in with the detailed OpenClaw setup guide, I want to recommend an easier option. Hostinger VPS provides a 1-click OpenClaw setup template on Docker that bypasses the whole complicated OpenClaw setup process. If you’d rather do it yourself, jump to the detailed guide. If you’re interested, here’s a short guide on how to set up OpenClaw with Hostinger:
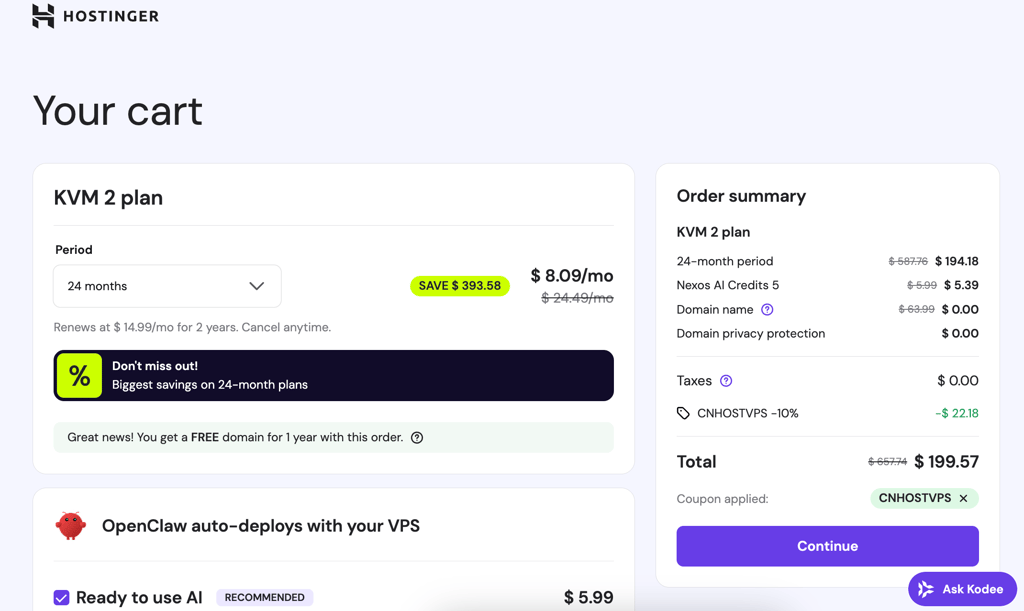
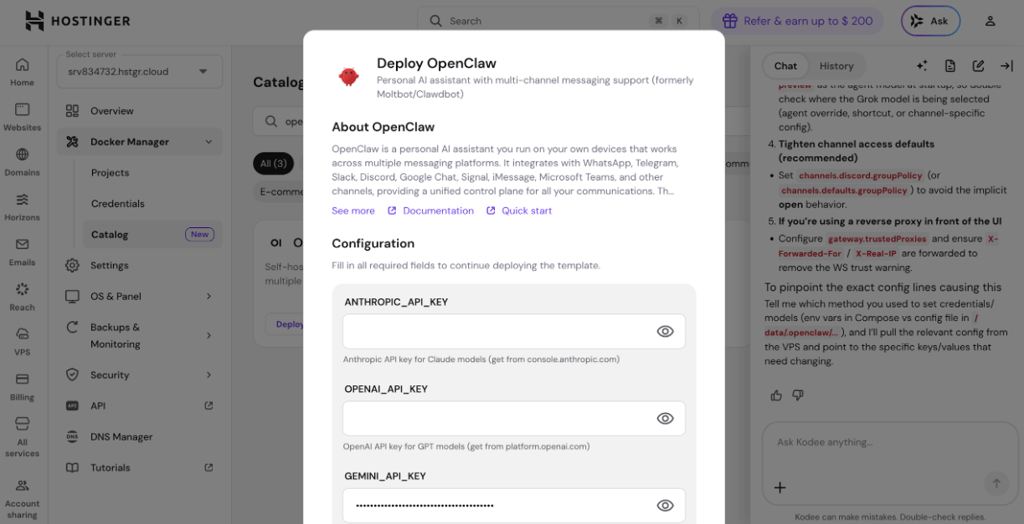
- Acquire the API key from your chosen AI model, such as Anthropic or OpenAI. There’s also an option to use nexos.ai credits, which lets you access a number of different models without an API key.
-
Purchase a plan from Hostinger OpenClaw VPS hosting page. Here, you can also add nexos.ai credits to your plan.

-
Copy and save the OpenClaw gateway token and add your WhatsApp number. If you’re using an API key instead of nexos.ai credits, input the API key in the required field. Click Deploy.

-
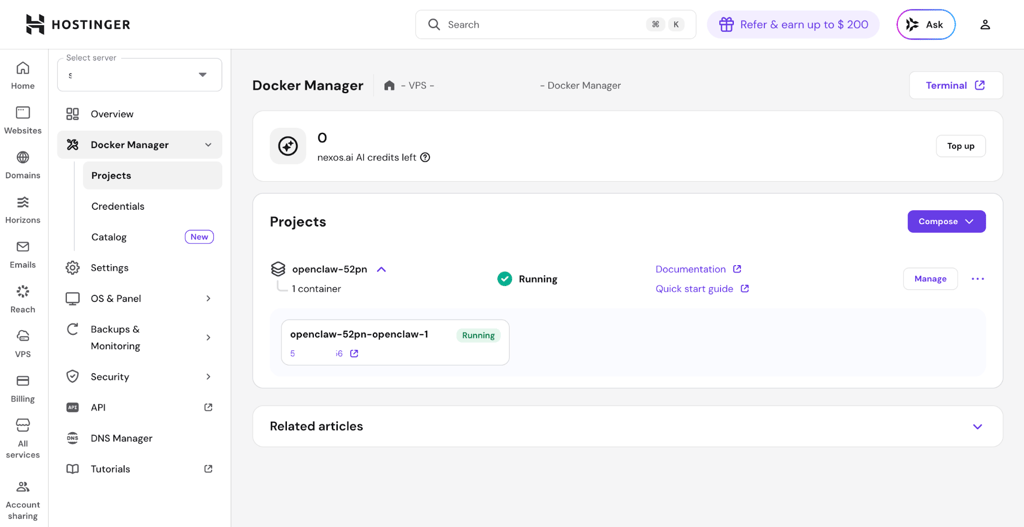
Hostinger will automatically deploy OpenClaw. You will be redirected to the Docker Manager, where you can access your OpenClaw project.

- Click the link under your project name to access the OpenClaw web interface and paste the gateway token you copied earlier.
You can also set up OpenClaw on your existing Hostinger VPS. To do that, simply change the OS to Docker (access through VPS > Manage > OS and Panel > Operating system), and deploy OpenClaw from the Docker template catalog (access through Docker Manager). You can do all this via Hostinger’s hPanel.
How to deploy OpenClaw with Docker: step by step

The below guide is for deploying OpenClaw with Docker on a VPS. Keep in mind that the steps might be different depending on your provider, or with a local machine (like a Mac).
- Check your prerequisites and system requirements
- Connect to your VPS
- Install Docker
- Clone the OpenClaw repository
- Create persistent host directories
- Generate secrets
- Create the
.envfile - Configure
docker.compose.yml - Build and launch
- Connect from your local machine
OpenClaw is not meant for beginner users. Extreme care should be taken both for data protection and security, and the overall tool usage: OpenClaw might have security gaps that can be difficult to control or patch for non-technical users.
This guide is for illustration purposes only, and Cybernews is not responsible for the users’ server configuration and server security. Users are responsible for their own data and server security. Users should always keep their API keys, passwords, and gateway tokens a secret, not expose them to the public, and ensure they can’t be leaked. The most up-to-date information about security and setups can be found in official OpenClaw documentation, which we recommend following first.
Step 0: prerequisites
Make sure that you and your server have the following before proceeding:
- 1–2 vCPU, 1–2GB RAM, >500MB SSD storage
- VPS with Ubuntu or Debian and root SSH access
- Your model auth credentials, such as Anthropic API key
The setup itself should take around 20 minutes.
Step 1: connect to your VPS
Enter the following command into the command line interface:
ssh root@YOUR_VPS_IP
Step 2: install Docker
Install Docker on your server:
apt-get update
apt-get install -y git curl ca-certificates
curl -fsSL https://get.docker.com | sh
Verify:
docker --version
docker compose version
Step 3: clone the OpenClaw repository
Enter the code below with the link to the OpenClaw GitHub repository:
git clone https://github.com/openclaw/openclaw.git
cd openclaw
Step 4: create persistent host directories
Docker containers are ephemeral. All states must live on the host to survive restarts.
mkdir -p /root/.openclaw/workspace
chown -R 1000:1000 /root/.openclaw
Step 5: generate secrets
Run this twice: once for the gateway token, once for the keyring password:
openssl rand -hex 32
Save both outputs, because you'll need them in the next step.
Step 6: create the .env file
Create the .env file, and Replace YOUR_GENERATED_TOKEN and YOUR_GENERATED_PASSWORD with the values from step 5.
cat > .env << 'EOF'
OPENCLAW_IMAGE=openclaw:local
OPENCLAW_GATEWAY_TOKEN=YOUR_GENERATED_TOKEN
OPENCLAW_GATEWAY_BIND=lan
OPENCLAW_GATEWAY_PORT=18789
OPENCLAW_BRIDGE_PORT=18790
OPENCLAW_CONFIG_DIR=/root/.openclaw
OPENCLAW_WORKSPACE_DIR=/root/.openclaw/workspace
Add .env to .gitignore so you never commit it:
echo ".env" >> .gitignore
Step 7: configure docker-compose.yml
The repo already includes docker-compose.yml. Open it and make sure the command includes --allow-unconfigured:
nano docker-compose.yml
The command section should look like this:
command:
      [
        "node",
        "dist/index.js",
        "gateway",
        "--bind",
        "${OPENCLAW_GATEWAY_BIND:-lan}",
        "--port",
        "18789",
        "--allow-unconfigured",
      ]
Also make sure the image line has a build: . line directly below it:
services:
  openclaw-gateway:
    image: ${OPENCLAW_IMAGE:-openclaw:local}
    build: .
Step 8: build and launch
Enter the following commands to initiate the build:
docker compose build && docker compose up -d openclaw-gateway
The build will take a few minutes. Watch the logs to confirm it started:
docker compose logs -f openclaw-gateway
You should see:
[gateway] listening on ws://0.0.0.0:18789 (PID 7)
Step 9: connect from your local machine
On your local machine (not the VPS), open an SSH tunnel:
ssh -N -L 18789:127.0.0.1:18789 root@YOUR_VPS_IP
Then open your browser and go to:
http://127.0.0.1:18789/
Paste your OPENCLAW_GATEWAY_TOKEN from the .env file when prompted.
Common issues when deploying OpenClaw with Docker
Deploying OpenClaw does require some knowledge, especially of how to work with CLI and Docker. If you’re a total beginner, chances are you will run into some issues. Below is a list of the most common issues and some tips on how to overcome them:
- Port conflicts. If you get an error for “port already in use” or “address already in use,” check what is using port 18789, change OpenClaw’s port via editing docker-compose.yml, or use a different port mapping.
- Container not starting. If your container doesn’t start, or starts and immediately stops, the reasons could be missing or invalid API keys, Docker Compose configuration problems, insufficient permissions, or the port 18789 being already in use. To check the underlying cause, check your container status, view logs for errors, and look for a specific error.
- Permission issues. If you’re running into issues with permissions, the possible causes include UI/GID mismatch between the host and container or the container running as a non-root user without write access to mounted directories.
- Volume not persisting. If data disappears when you restart or recreate containers, it could be an issue of using anonymous volumes, incorrect mount paths, recreating containers without preserving columns, or volumes being defined inside the container’s image layer. What you can do is use explicitly named volumes, verify mounts, and avoid using docker compose down -v, which removes volumes.
- Insufficient RAM crashes. If you’re constantly running out of RAM, the issue could be you not setting memory limits for the agent, or simply using a VPS with too little memory (2GB is the minimum requirement). To fix this, you should set memory limits, reduce context window size, monitor real-time usage, and/or increase RAM.
Docker daemon errors. In general, Docker daemon errors might be caused by any error listed above, or corrupted Docker installation and the service simply not running. What you can do in this case is start the Daemon, add the user to Docker group, check port availability, and reinstall Docker if all else fails.
Production considerations
When deploying OpenClaw in a Docker container for production, there are several crucial aspects to keep in mind.
Firstly, setting up a reverse proxy such as Nginx is a key step. Nginx can manage incoming traffic, route requests to your OpenClaw container, and serve as a central point for SSL termination. For secure communication, integrating SSL certificates from Let's Encrypt ensures that all data between users and your application is encrypted. Automating certificate renewal with Let's Encrypt tools helps maintain continuous security without manual intervention.
Firewall configuration is another critical aspect. Only necessary ports should be open, such as those for HTTP, HTTPS, and any required OpenClaw service. All other ports must be closed to reduce the attack surface. Managing environment variables securely is equally important. Sensitive information like database credentials or API keys should never be hardcoded in Dockerfiles or shared in version control. Instead, use Docker secrets, environment variable managers, or orchestration tools that support encrypted secrets management to keep this data protected.
Ongoing operations require robust resource monitoring and a reliable backup strategy. Use monitoring tools to track CPU, memory, and disk usage for your OpenClaw containers, alerting you to potential bottlenecks or failures before they impact users. Regularly back up both your application data and Docker volumes, storing copies offsite when possible. When updating the OpenClaw container, follow a safe process: pull the new image, test it in a staging environment, then perform a rolling update or blue-green deployment to minimize downtime and reduce the risk of introducing errors into production.
Scaling OpenClaw in production
Scaling OpenClaw in production with Docker can be approached in two main ways: vertical and horizontal scaling. Vertical scaling means increasing the resources available to your OpenClaw container, such as allocating more CPU cores or RAM. This approach is straightforward and can quickly boost performance for heavier workloads, but it is limited by the physical capacity of your server.
For larger or more dynamic environments, horizontal scaling is often more effective. This involves running multiple OpenClaw containers across several machines to handle increased demand. Orchestration platforms like Docker Swarm or Kubernetes make it easy to automate the deployment, scaling, and management of these containers. These tools can monitor resource usage and automatically start new containers when traffic spikes or shut them down when demand drops, ensuring efficient use of infrastructure.
Load balancing is essential when using horizontal scaling. A load balancer distributes incoming requests evenly across all running OpenClaw containers, preventing any single container from becoming a bottleneck. Proper concurrency handling within OpenClaw is also important, as it ensures the application can process multiple requests at once without errors or slowdowns. Combining these strategies allows you to deliver reliable, high-performance service even as user numbers grow.
Final thoughts
The flexibility, environment independence, and reproducibility offered by Docker make it an ideal choice for deploying OpenClaw, especially for production environments. By containerizing OpenClaw, you bypass common dependency conflicts and ensure consistent operation across development and deployment.
Running OpenClaw in Docker significantly enhances its scalability. Whether through vertical scaling by boosting resources, or horizontal scaling across multiple instances managed by orchestration tools like Docker Swarm or Kubernetes, Docker provides the foundation for a reliable and high-performing AI agent service. By focusing on security and maintenance, you can ensure a stable, scalable, and hassle-free OpenClaw deployment.
FAQ
What is the best OpenClaw hosting?
Based on our research, the top choice for hosting OpenClaw is Hostinger. Hostinger stands out for its fast one-click OpenClaw deployment, pre-configured VPS Docker Manager template, and reliable performance. You can find more details and compare other recommended providers in our best OpenClaw hosting list.
What is the best Docker hosting?
Based on our research, Hostinger is the top overall choice for Docker VPS hosting. Hostinger offers Docker-specific VPS plans with pre-installed Docker, strong resource isolation, and an easy-to-use Docker Manager, making it ideal for both beginners and advanced users. For more options and detailed comparisons, check out our best Docker hosting list.
How do I update the OpenClaw Docker container?
To update the OpenClaw Docker container, pull the latest OpenClaw image from the Docker registry, stop the running container, and start a new one with the updated image. Always back up your data before updating, and use Docker Compose or versioned tags to control the update process safely. This ensures your deployment stays current while minimizing downtime and reducing the risk of data loss.