Hostinger WordPress tutorial 2026: a guide for beginners
Our in-house experts conduct internal independent, hands-on testing and transparent reviews of web hosting providers by using custom-built tools or utilizing industry-recognized tools and methods to ensure impartial and evidence-based assessments.
Using the same criteria for all services, we share our detailed methodologies and practices to help customers make informed hosting decisions.
Learn more
Gone are the days when building a WordPress website required intricate coding knowledge and tons of time and money. Now, website creation has become so easy that anyone can do it within just a few hours. Hosting providers like Hostinger greatly simplify the process, offering robust performance, affordability, ease of use, plugins with every feature you can think of, and eye-captivating themes.

In this Hostinger WordPress tutorial, I’ll guide you step by step through choosing a hosting plan, installing and setting up WordPress on Hostinger, migrating a website, and using a staging feature, different plugins, and themes.
Why choose Hostinger for WordPress
Hostinger is an industry-leading web hosting provider, and it's officially recommended by WordPress.org. In our Hostinger review, the Cybernews team analyzed it in more detail and found that it has these honorable titles for a reason. It’s easy to use, affordable, feature-rich, and has a top-notch performance. What's more, you get an even bigger discount with this additional Hostinger promo code: CNHOSTINGER.
- Intuitive custom control panel (hPanel). It simplifies launching and hosting a WordPress website.
- Drag-and-drop web builder. It helps create and manage content on your site without any coding.
- Free important features. These include a free domain for a year, a business email, and unlimited SSL.
- Irreplaceable WordPress tools. These include an Auto Installer, a smart auto-update tool, AI Troubleshooter, and staging environments.
- Data centers in 9 countries across 4 continents. It accelerates performance worldwide.
- Enhanced performance. It includes LiteSpeed Web Servers and a free CDN on premium or cloud-based plans.
- AI-driven tools. These come in handy with website building and optimization.
- Pocket-friendly Hostinger pricing. The 2-year plan starts at $2.69/month, and you get a 30-day money-back guarantee.
Understanding WordPress basics
Before diving into WordPress' deep waters and all the features, tools, and plugins that can ease your journey, let's look at the website management basics. I've compiled a beginner-friendly dictionary to help you better understand and navigate WordPress:
- The admin dashboard (or simply dashboard). This is the WordPress site's control panel. It's a place where you can customize your site by navigating tabs, creating and publishing content, and managing users.
- Theme. This is the template that determines how your site looks and feels. It's like the face of your website and the first thing visitors see when they access it. You can choose from a vast library of free and premium themes to find what best reflects your business.
- Plugin. You can install this lightweight software component on your site to add new features and functionality. There are thousands of free and premium plugins with different functionalities in the WordPress Plugin Repository. However, keep in mind that overstuffing your site with plugins can slow down its performance.
- Header. This introductory section is visible at the top of your site. Going into more detail, it combines a site title, a logo, and a navigation menu.
- Footer. This is the button part of your site that appears after the main content area. It's where contact information, social media profiles, and copyright information are located.
- Page. This is one of two types of content displayed on your site. Usually, it's static and permanent information like About Us, Contact, or Terms of Service.
- Post. This is another way to display content. It's more dynamic and time-sensitive information, like blog articles.
- Block. This is the fundamental component of content on your site. Blocks allow you to visually interact with any piece of content, with or without using code.
Hostinger WordPress tutorial: a step-by-step guide
Whether you’re a beginner or already familiar with web design, building a WordPress site with Hostinger is straightforward and intuitive. First, it has an automated WordPress migration and installation. Moreover, it offers a drag-and-drop web builder with powerful AI tools to simplify content creation. Here’s a step-by-step guide on how to create your first website:
- Choosing a hosting plan
- Adding a website
- Migrating a WordPress website
- WordPress installation
- Using a WordPress staging feature
- Creating a WordPress website
- Selecting a theme
- Installing plugins
If you consume content better in visuals than words, you might find Cybernews’ Hostinger WordPress tutorial video more helpful. Here, our team goes through every step of crafting a WordPress site in about 6 minutes.
Choosing a hosting plan (skip this step if you have a plan already)
The first step to building your WordPress site is selecting a web hosting provider. Hostinger offers a broad spectrum of web hosting plans, but what you should look for is a managed WordPress hosting plan. The reason is simple: it’s specifically designed for websites built on WordPress.
WordPress hosting features ensure next-gen performance and optimization for any WordPress site. Unlike other hosting plans, it packs built-in WordPress features, an object cache, a WordPress staging tool, and an AI content generator, not to mention the expert support team. There are four managed Hostinger WordPress hosting plans that you can choose from:
- Premium plan with everything you might need for website creation
- Business plan that has extra power and enhanced features
- Cloud Startup plan with perfectly optimized performance and powerful resources
- Cloud Professional plan that’s designed for high-traffic sites and large-scale projects
Adding a website
When you create a website on Hostinger, it’s automatically added to your hosting plan. However, with most WordPress plans, you can host multiple websites within the same hosting plan. Simply click on Add website and choose a preferred hosting plan.

Migrating a WordPress website (skip if you are creating a new website)
If your WordPress website is hosted on a different platform, but you’re now convinced that Hostinger is the better choice, you can easily migrate it. There are a few ways to migrate a website, from manually to using a plugin. I’d recommend a third option: use Hostinger’s free migration service and fill out the form, letting a dedicated team take care of it:
-
In your hPanel, go to Migrations and click on Migrate Website. Here, you will also find all your website migration requests and their status, whether rejected, pending, or completed.

-
Choose a hosting plan to which you wish to migrate your website. It’s best to choose the plan with features you’ll benefit from and also the right amount of resources for your website.
-
Once you select the best plan for your website’s needs, click Continue.
-
For a live WordPress site, choose the Use login details option and fill out the website and admin login details. But if you have an offline website, you’ll need to select Upload backup files and follow the given guidelines.
-
Provide your website’s URL and click Next.
-
Specify on which platform your website is created.
-
Fill out the admin login details.
-
You will be assigned a temporary domain, which you can change later. Click on Submit request and give 24 hours for the migration to complete. Hostinger WordPress admin details


My honest advice: before sending the migration request, disable any two-factor authentication (2FA) or anti-bot features on your hosting account and wp-admin area. Also, make sure you have enough space on your current server for a backup.
WordPress installation
What I like about Hostinger is that it always gives you options. Hence, there are two ways you can install WordPress on Hostinger. The first is to do that automatically during hPanel’s WordPress onboarding and the second is to use the Auto Installer method. I’ll show you how to install WordPress with Auto Installer:
-
Open Auto Installer and select WordPress.
-
Add the installation details.
-
Select when you want to receive application updates. I recommend keeping a minor updated version.


After you install WordPress, log in with your Hostinger account to access hPanel. Then, navigate to the Websites section and select the Admin Panel next to the WordPress you want to begin managing. Alternatively, you can reach the WordPress login URL by adding /wp-admin to your site URL. However, this approach may not be as convenient as using hPanel.
Using a WordPress staging feature
WordPress’ staging feature is like a playground where you’re free to experiment with different ideas, themes, and plugins. Any test changes you make here won’t affect your website, even if things go south. Created as a duplicate of your live website, it also helps to identify bugs or critical issues before the site goes live. Let’s see how to make a staging environment with the WordPress staging tool step-by-step:
-
In your hPanel, go to the Staging tab and click Create staging.
-
A pop-up window will show up. Enter your subdomain name and click on Create to generate a staging environment.
-
Creating a staging environment can take up to 15 minutes, depending on the size of your production website. Smaller websites usually take less time, as they need fewer resources to do the task. You can click on Close to dismiss the confirmation message.
-
Here, you’ll see the status of your staging environment. After the process is complete, its status will change from In progress to Completed.
-
Your staging environment is now all set. Select Manage staging next to the preferred staging site, and you can begin using it.
-
You’ll be redirected to a newly created Staging dashboard. From here, you can access the WordPress admin area by clicking the Staging Admin Panel.
-
In the Staging Admin Panel, you can make changes to your posts and pages, try out plugins, and modify themes without disrupting your live website. You can even create content with the help of AI.
-
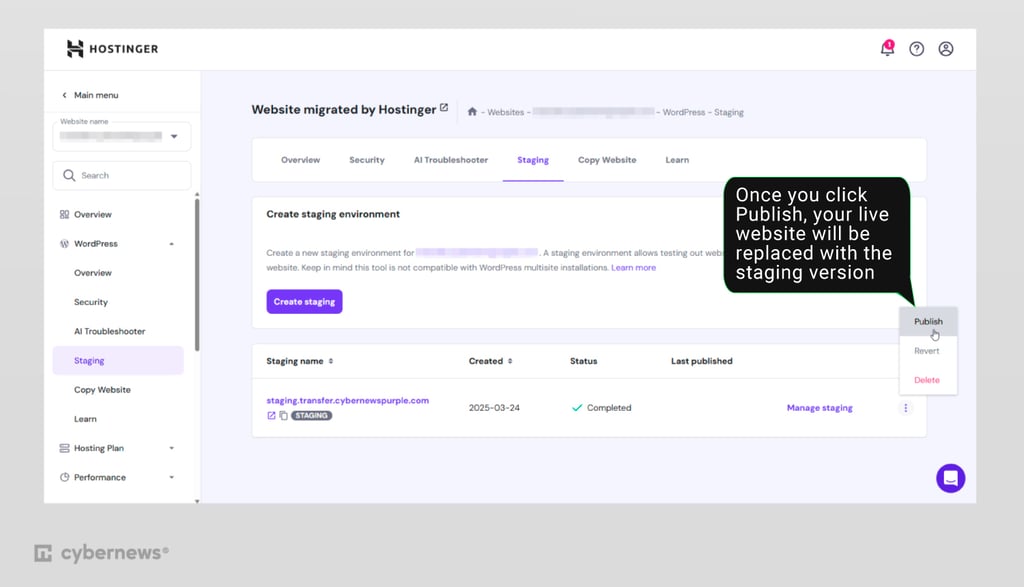
If you’re happy with the changes, apply them to your live website. For this, return to the WordPress staging page on hPanel by clicking on WordPress and then Staging. Click the three-dot icon next to the updated staging site and Publish.
However, if you decide to revert these changes, you can do that even after publishing. The tool automatically saves a backup before publishing the staging environment so that you can return to the old version.


If you’re wondering whether you can connect an existing domain to your Hostinger WordPress site, the answer is yes. This can be done in four steps, regardless of where your domain is registered:
- Check whether it meets the criteria. You need full ownership and control over this domain name and access to its settings to edit DNS records, DNSSEC should be disabled, and the domain should be active. Plus, decide where at Hostinger you want to point it.
- Add it to your hosting plan. Go to Websites, click Add website, and follow the onboarding process. You can either enter your domain name during setup or use a temporary domain and connect it later.
- Connect it to your hosting plan. In the Websites section, locate your website in the list and click Check guide next to the Domain not connected message. If the domain is registered on your account, you won’t need to do anything. However, if it’s registered with a different provider, you’ll have to change the domain nameservers or the A record.
- Save the changes. Once you update your DNS records, mark the checkbox to confirm the changes. Remember that it can take up to 24 hours for the changes to appear, and during this time, your website may be temporarily unavailable.
Creating a WordPress website
Creating a website with Hostinger is easy, even if you don’t have prior website creation experience. From the start, Hostinger gives you two invaluable helpers: a beginner-friendly website builder and a built-in AI assistant that streamlines the whole process. If you have more experience, you can also try to build your website with WordPress AI plugins developed by Hostinger, but that’s slightly more complicated than using the web builder. Below, I’ll walk you through the process I use to create a WordPress website:
-
In your hPanel, go to the Websites list, click Add website, and select WordPress.
-
Create a WordPress account and click on Next.
-
Choose how you want to build a website: use a pre-built website or create a website with the help of AI. Usually, I prefer creating a website with AI because it only takes a few minutes and saves the time I would otherwise spend modifying preset content in pre-built templates. However, this time, I’ll choose a pre-built website.
-
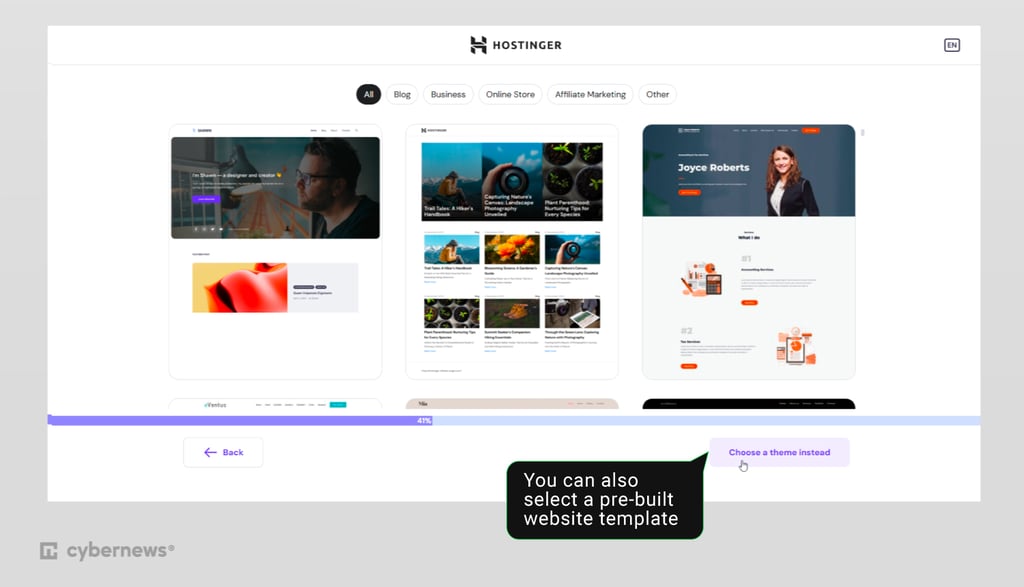
Select what type of website you’d like to build. What’s really great is that Hostinger offers a variety of options, from online shops to portfolios.
-
Or select a pre-built theme instead.
-
Pick a theme that best reflects what your website is about.
-
Proceed by clicking on Next.
-
Here, you’ll get recommendations for plugins for the type of website you choose. Check what plugins your website needs and click Next. Since I’m creating an e-shop this time, Hostinger recommended plugins best suited for eCommerce: Email Marketing by Omnisend, All in One SEO, and WPForms. I’ll stick with these three to avoid overloading my new website.
-
Wait for the installation to complete and begin to manage your website.


Selecting a theme
Themes shape the website’s appearance without using any code. With their help, you can attract the visitor’s eyes with web design elements, including color and typography, that convey your brand personality. Usually, themes and plugins are installed during the initial website setup, but you can also find and install them later:
-
In the WordPress admin panel menu, click on Appearance and choose a theme
-
Here, you can also find and manage your installed themes


Installing plugins
From speeding up your website to improving its ranking on search engines, plugins can help make your WordPress site the best it can be. While the essential plugins depend on the type of site you're building, some are must-haves for most websites. I recommend choosing plugins that enhance security and backups, improve SEO and analytics, and optimize performance. However, avoid overloading your site with unnecessary features that take up space. Here’s how to install a plugin to enhance your website’s functionality and performance:
-
In the WordPress admin panel menu, select Plugins and install the plugin you need
-
Here, you can also find and manage your installed plugins


Final thoughts
Hostinger is excellent for beginners building one of their first WordPress websites. First, you don’t need profound IT knowledge or coding skills. Second, it’s easy to use with its web builder and AI assistant and feature-rich with valuable plugins and beautifully crafted themes. Most importantly, it has top-notch performance but is affordable, with plans starting at $2.69/month. And if you get lost at any step, its 24/7 customer support helps you find the solution. I’d recommend it to anyone who wants a simplified WordPress hosting or web creation solution without paying a fortune.
Hostinger WordPress guide: FAQ
Which Hostinger hosting plan is best for WordPress beginners?
I’d recommend a managed Hostinger WordPress plan (Premium, Business, Cloud Startup, or Cloud Professional) for anyone starting with WordPress. These plans are specifically designed for WordPress websites. Unlike other hosting plans, they pack built-in WordPress features, an object cache, a WordPress staging tool, and an AI content generator, as well as an expert support team.
Does Hostinger offer free SSL certificates for WordPress sites?
Yes, Hostinger offers free SSL certificates for all WordPress sites. This means that it automatically installs an SSL certificate on any websites you create.
How do I improve the speed of my WordPress website on Hostinger?
There are many plugins, tools, and techniques to speed up your WordPress website on Hostinger. For example, you can optimize WordPress images, turn on GZIP compression for WordPress, and set up a content delivery network (CDN). Moreover, you can use plugins like WordPress caching, activate lazy loading, and defer JavaScript parsing.
Can I install WordPress on Hostinger without technical knowledge?
Yes, you can install WordPress on Hostinger without technical knowledge. Hostinger provides a custom onboarding flow without a manual setup when setting up a new site. The whole process is easy and intuitive, even for non-technical users.
Can I migrate my existing WordPress site to Hostinger?
Yes, you can migrate your existing WordPress site to Hostinger. All you need to do is contact Hostinger’s migration team, which will do that for you free of charge.
How do I enable automatic updates for WordPress, themes, and plugins?
You can manually enable automatic updates for WordPress, themes, and plugins or let Hostinger’s Automatic WordPress Updates solution handle everything for you. For automatic updates, search for WordPress on your WordPress website’s dashboard, then click on Security and open it. In the Automatic updates configuration, select Enable all automatic updates and confirm.