How to monitor your data on the dark web
Our in-house cybersecurity experts and journalists, renowned for major reports like The Mother of All Breaches, conduct transparent, unbiased VPN testing and in-depth analysis.
With 750+ articles crafted based on real-world research, we empower readers to make informed purchasing decisions through first-hand expertise.
Learn more
Unfortunately, data breaches have become routine. Login credentials, phone numbers, and payment details leaked from one service can end up in databases traded or published on sites that ordinary search engines don’t index. Dark web monitoring tools can alert you when they detect your information in these sources, helping you respond to the exposure.
In this guide, I explain how dark web monitoring works, how to set up alerts for your email accounts within a security suite, and what to do if your credentials appear in a breach. I also cover everyday habits that can help protect your accounts and reduce your exposure in the first place.
What is dark web monitoring?
The dark web is a part of the internet accessed through specialized software or networks, such as the Tor browser. It’s not illegal in itself, but some of its marketplaces and forums are used to trade or publish stolen data. Monitoring services may also check sources outside the dark web, including internet forums and other websites where compromised information circulates.
A dark web monitoring tool checks those sources for personal information that belongs to you. Depending on the service, information it can monitor or flag may include:
- Email addresses
- Passwords and password hashes associated with those emails
- Phone numbers
- Credit or debit card numbers
- National ID or Social Security numbers
- Usernames and other account identifiers
Which items you can monitor depends on the tool you choose (as different providers cover different sources) and, in some cases, the plan tier.
How it works
Dark web monitoring services generally don’t literally search the dark web for you in real time, although some providers offer daily or continuous scanning. Instead, monitoring services monitor the sources they cover, not every hidden site or private channel.
The exact process varies by the provider, but usually involves the following stages:
- Collection. The provider gathers information from the sources it monitors, including forums, websites, dark web channels, and leaked datasets.
- Processing and matching. It processes the collected information and checks for matches against the personal details you have registered.
- Alerting. If it finds a match, it notifies you so you can take appropriate action. Usually, it’s an in-app alert and an email, along with the available details of the breach and the type of data exposed.
An alert doesn’t necessarily mean someone has accessed your account. It means the service found information matching your monitored details in a potentially compromised context. What you do next depends on what was exposed, and responding promptly helps limit the potential harm.
It’s also crucial to distinguish what dark web monitoring can and cannot do for you.
| What dark web monitoring can do | What dark web monitoring cannot do |
| Alert you when it finds information that matches your monitored details across the sources it covers. | Guarantee that it will discover every exposure. |
| Help you understand which information has been exposed. | Always identify where the information originally came from. |
| Give you a reason to review your account security and respond to potential misuse. | Erase the stolen information or undo the breach. Many breaches are never published, and coverage differs between providers. |
As such, it’s better to treat dark web monitoring as a warning system rather than a solution. Before registering sensitive details, I recommend reading the provider’s privacy and security documentation to better understand how it handles your information.
What tools can you use for dark web monitoring?
You don’t need a paid subscription to start checking for exposed information. Free breach-alert services are one option, and you may already have relevant features in your password manager or VPN subscription. Common options include:
- Free breach-lookup services. Have I Been Pwned lets you check whether your email address appears in its breach database and subscribe to notifications when it appears in newly added breaches. Mozilla Monitor also offers free email-based breach monitoring.
- Password managers. Some include security reports that flag compromised passwords, accounts associated with known breaches, or other risks such as reused passwords. For example, 1Password’s Watchtower integrates with Have I Been Pwned to help identify exposed credentials.
- Browser and operating-system tools. Even though I’d prefer a dedicated password manager, browser and operating-system tools can help identify saved logins that need attention. Just keep in mind that their checks vary. Firefox, for example, warns about saved logins associated with breached websites and flags reuse of potentially exposed passwords. These alerts are useful, but they don’t cover other types of personal information.
- Security suites and VPN subscriptions. Several premium VPN providers bundle dark web monitoring with other tools. Check whether monitoring is included in your chosen plan, which information it covers, and how many email addresses you can register. For example, NordVPN offers its Dark Web Monitor feature even with its entry plan, but upgrading to Dark Web Monitor Pro covers more assets.
- Credit monitoring and identity-protection services. Look for a package that explicitly includes monitoring for the financial or government-issued identifiers you want to track. Check credit-report alerts separately, as they aren’t the same feature as dark web monitoring.
Start by checking the features you already have. I’d say using multiple sources is reasonable, since no single database covers every breach. However, before adding another service, compare what it monitors and whether it offers useful coverage beyond your existing tools. It might turn out you already have more things covered than you think.
How to set up dark web monitoring in a security suite: step-by-step guide
The exact menu names differ, but the setup follows the same pattern in most tools. For this example, I’m setting up NordVPN’s Dark Web Monitor feature on my Mac to show how to turn on dark web monitoring, add an email address, and check alerts.
Step 1. Turn on monitoring
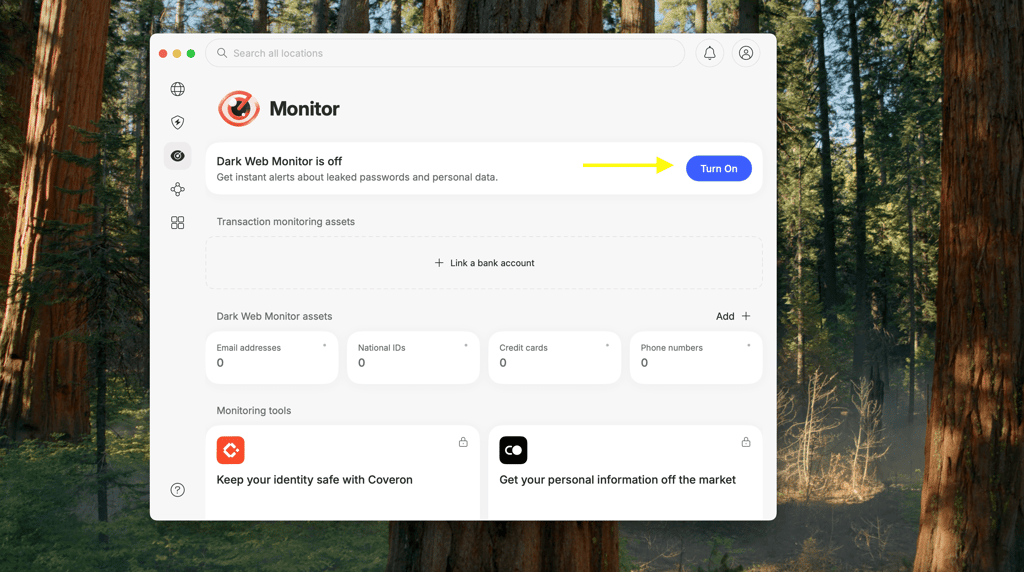
Open the NordVPN app, click Monitor, then click Turn On. This action will take you to the Dark Web Monitor settings for your Nord Account.
Step 2. Add an email address and additional asset types
From the Dark Web Monitor page in your Nord Account, go to the Asset management tab, and start with the Add email address field. Enter the 6-digit one-time password sent to that address to verify it.
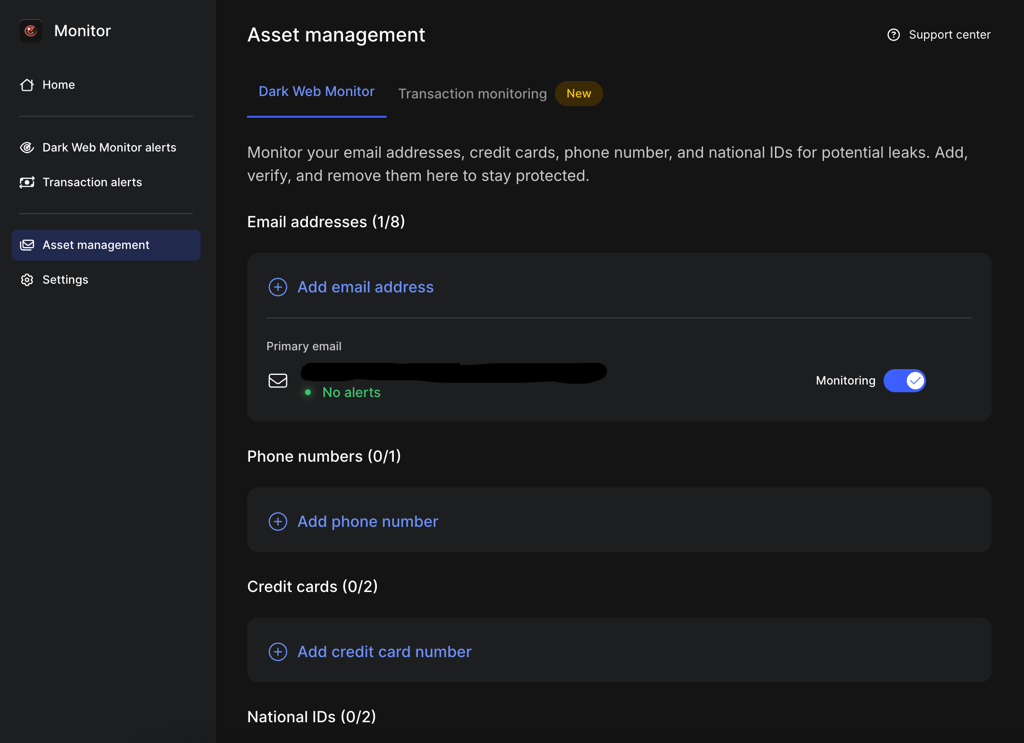
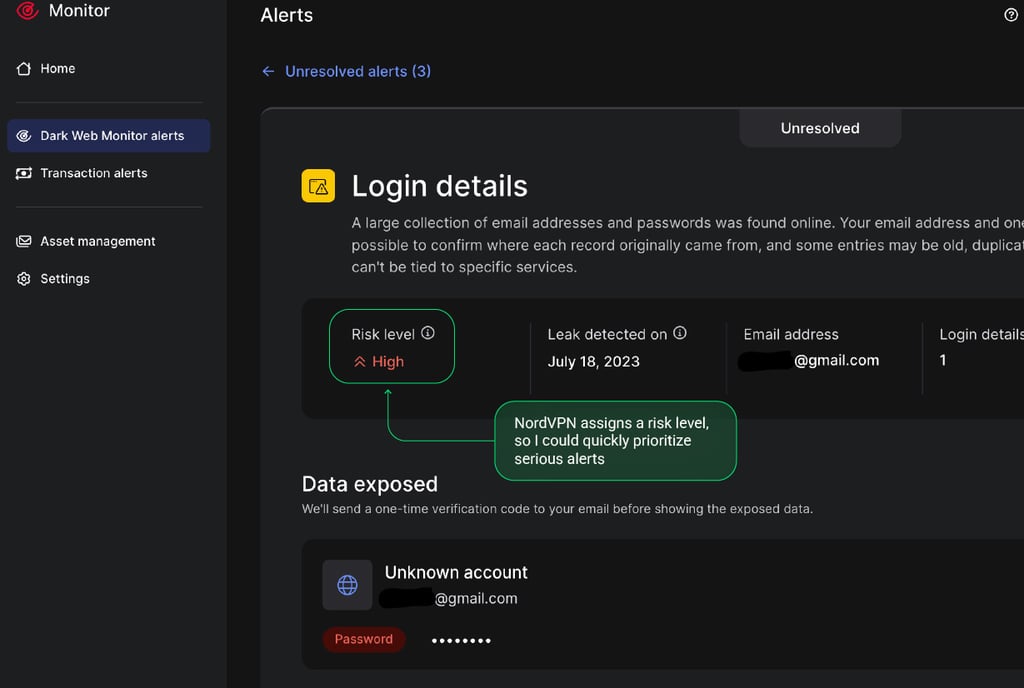
After that, the service alerts you if a breach involving that address is detected. You can also check manually: log in to your Nord Account, open Dark Web Monitor, then Dark Web Monitor alerts, where alerts are sorted into unresolved and resolved.
In the same Asset management area, the Pro tier lets you add phone numbers (verified with a one-time code sent by text), credit card numbers (you confirm you are the cardholder), and national ID or SSN numbers. Users in the US and Canada can also set up transaction monitoring.
If the add button is greyed out, it means that your plan doesn’t include that asset type or you have reached the limit.
Step 3. Check your alert settings
When an exposure is found, you get an in-app notification and an email to your account address. Opening an alert shows what was exposed and recommended steps. Note that email alerts can be turned off in the Dark Web Monitor settings in your Nord Account, so make sure they are enabled if you want to receive them.
Other providers, such as Surfshark with its Alert feature, work on a similar principle: you register the email addresses or other data to watch, verify them, and receive alerts. Check the provider's own help pages for current steps.
What to do when your credentials are exposed
If you receive an alert, first check what information was exposed. The actions you need to take depend on whether the alert involves a password, financial details, or other personal information.
Read the alert carefully
Note which site or breach is named, what was exposed (email only, password, card number, ID number), and when. This determines how serious the exposure is.
Change the exposed password immediately
Go to the affected account and set a new, unique password. Don’t reuse any variation of the old one. It’s also a good practice to change the same password everywhere else you used it. Attackers routinely try leaked credentials on other sites (a practice known as credential stuffing).
If you cannot log in, use the account recovery process right away, as the account may already have been taken over.
Turn on multi-factor authentication
Enable MFA on the affected account and on your email account, since email can reset passwords everywhere else. I recommend opting for an authenticator app, passkey, or hardware security key over SMS codes where available.
Check for signs of unauthorized access
Next, review recent login activity and signed-in devices, and sign out of all sessions. Check account recovery email and phone numbers, forwarding rules in email, and connected third-party apps, as attackers often change these to keep access. Also, look for unfamiliar purchases, messages, or changes to settings.
Was financial data exposed?
If so, contact your bank or card issuer immediately, and ask them to replace the card. Review recent transactions and set up transaction alerts.
If your SSN was exposed, consider freezing your credit with all three US credit bureaus: Equifax, Experian, and TransUnion. Freezes are free and can be temporarily lifted when you need to apply for credit. Alternatively, you can place a free fraud alert by contacting one of the three credit bureaus, which must notify the other two.
Outside the US, check the guidance from your local identity-theft authority, credit-reporting agencies, or the organization that issued the exposed ID.
Expect follow-up scams
Leaked emails and phone numbers are used for phishing and impersonation. Be skeptical of unexpected messages that mention the breached service. Always go directly to the official site instead of clicking links.
Record what happened
Once you have taken the recommended actions, record the changes and mark the alert as resolved in your monitoring tool. This helps you track your actions. If identity theft occurred, report it to the relevant authority (in the US, it’s IdentityTheft.gov).
Habits that reduce your future exposure
Monitoring is a safety net. These habits help protect your accounts and limit the damage if your information is exposed.
Use unique passwords for every account
Creating a unique, strong password for each account helps prevent a single leaked password from putting other accounts at risk. A password manager makes this practical by generating and storing long random passwords. Protect the manager with a strong master passphrase and MFA.
Use multi-factor authentication everywhere it’s offered
Even if a password leaks, a second factor can block the login. Prioritize email, banking, cloud storage, social media, and your password manager. Passkeys, where supported, are resistant to phishing and aren’t stored as reusable secrets on the service.
Limit the data you hand out
Here are a few ways to go about this:
- Get in the habit of only sharing what a service actually needs.
- Use email aliases or masked addresses for sign-ups so a breach doesn’t expose your main address. Some email providers and security suites offer this (e.g., Proton Mail).
- Delete accounts you no longer use and request deletion of associated personal data where available.
Keep software updated
Updates fix vulnerabilities that malware uses to steal saved passwords and session data. Enable automatic updates on your devices and browser.
Watch for phishing and info-stealing malware
Company breaches aren’t the only source of exposed credentials, so keep device security in mind, too. Avoid pirated software, unknown attachments, and links in unsolicited messages.
Review your exposure regularly
Here’s a quick checklist to keep in mind:
- Check your emails at a breach-lookup service every few months.
- Review which apps and sites have access to your accounts.
- If credit reporting applies in your country, review your reports regularly for unfamiliar accounts or activity.
Bottom line
Dark web monitoring tools compare the details you register against collections of leaked data and notify you on a match. To use them well, add every email address and relevant identifier you use, verify them, and keep alerts turned on.
When an alert arrives, check what was leaked and take the relevant protective action. Use unique passwords and multi-factor authentication to reduce the risk to your accounts and limit damage when the next breach happens.
FAQ
Does being listed on the dark web mean I was hacked?
Not necessarily. An alert doesn't, by itself, establish that someone accessed your account. The risk depends on what information was exposed and whether you act on it.
Can my data be removed from the dark web?
Generally no. Once leaked, copies spread. The practical response is to limit opportunities for misuse by changing passwords, enabling MFA, and replacing compromised cards.
How often are the databases updated?
It varies by provider. Some scan continuously, while others update when new breaches are indexed. A tool will not know about breaches that haven’t been published or discovered.
Is dark web monitoring enough on its own?
No. Dark web monitoring alerts you to exposures the service detects, but it doesn’t prevent the underlying breach. Use it alongside strong account security and the protective habits outlined above.