Remove Yahoo from Chrome completely


If Chrome keeps sending your searches to Yahoo even though you never changed your search engine, you may be dealing with a fairly common, but annoying, malware issue. Yahoo may not even appear in Chrome’s extensions or search engine settings, because the actual cause can be a suspicious extension, unwanted software, or a browser hijacker running elsewhere on your device.
In this guide, I’ll show you exactly how to remove Yahoo Search from Chrome completely, find what is causing the redirect, and restore your preferred search engine. I’ll also cover what to check if Yahoo keeps coming back, so you can stop the problem from repeating.

Why is Yahoo coming up instead of Google Chrome?
If Chrome suddenly starts redirecting your searches to Yahoo, Yahoo itself is not necessarily the problem. The main issue is an unexpected change in your search engine or repeated redirects you did not set up yourself.

These redirects can be caused by external software, such as malicious extensions, bundled programs, or a browser hijacker. If the change happened without your permission, the steps below will help you identify the cause, remove it, and restore your preferred search engine.
How to get rid Yahoo search engine from Chrome
Removing the Yahoo search engine from Chrome is going to help get your default search engine back. However, you have to remove the core of the problem so that hackers don’t change it again. This step-by-step guide will help you remove the Yahoo search redirect issue.
Step 1. Remove Yahoo redirect virus using an antivirus
It takes quite a while to remove malware manually. Also, you can't always be sure whether you’ve removed it completely. That’s why the best option is to choose a reliable antivirus program and run a scan.
Here are the steps to follow:
-
Choose an antivirus provider and go to its official website. I recommend Norton 360, now up to 60% OFF.

-
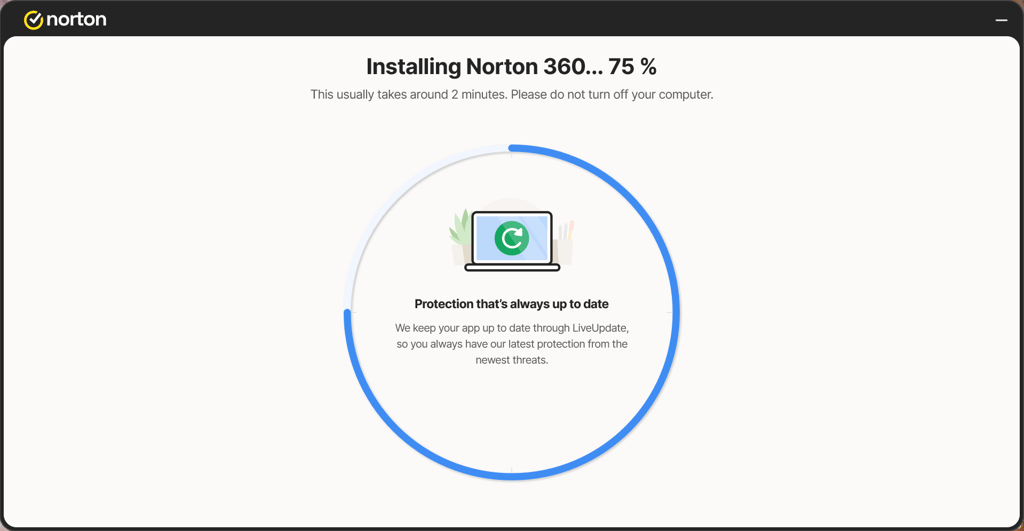
Purchase the plan of your choice, download and install the app.
-
Open the antivirus and run a full system scan.

- Remove the identified Yahoo redirect browser hijacker.
Step 2. Change your default browser
-
Open Google Chrome and click on the three dots (⋮) in the upper-right corner, then select Settings.

-
You will see a list of major browsers. Click on your preferred search engine to replace Yahoo, then click Set as Default.

-
In the Search engine section, select Change.

-
You will see a list of major browsers, click on your preferred search engine to replace Yahoo and click Set as Default.

-
Below, press the Manage search engines and site search option.

-
Select the three dots (⋮) by the Yahoo search engine and click the Delete button.

Step 3. Remove unwanted extensions
Some redirects can be caused by a browser extension that you accidentally installed. You can go through web extensions and either disable or remove any suspicious browser extensions. Yet, when it comes to malicious extensions, you should remove them completely.
Here’s how to do it:
-
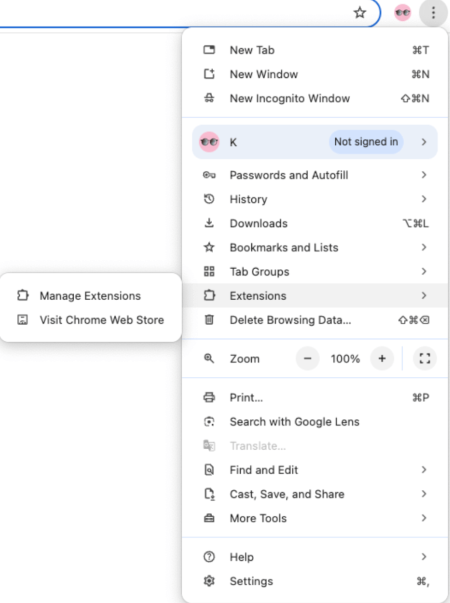
Click on the three dots (⋮) in the top-right corner of Chrome. Go to Extensions, and then press the Manage Extensions button.
-
Press Remove when you see any unrecognized extensions.

Step 4. Restore Chrome browser settings
If you see any changes to your settings, you can also restore them to their defaults in your advanced settings. All of the settings will go back to what they were when you first installed the browser – there won’t be any unwanted modifications.
This is a faster way to change the default search engine and disable extensions. However, it will disable all existing extensions in your Chrome browser. You can later enable them by clicking on three dots, then Extensions – Manage extensions.
-
Click on the three dots ( ⋮ ) on the upper-right corner of the browser. Press Settings

-
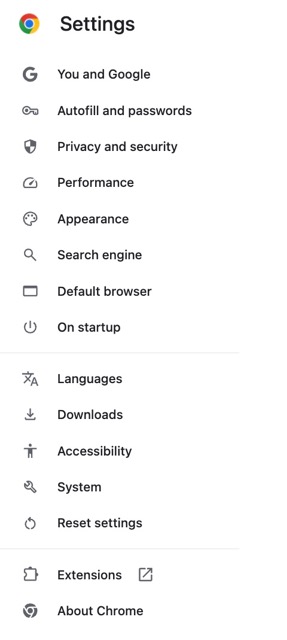
On the left side of the screen, click on the Reset settings option.
-
Click on the Restore settings to their original defaults section.

-
You’ll get a pop-up window asking to reset your settings. Click Reset settings.

- Reopen Chrome to enjoy a smooth browsing experience.
Step 5. Uninstall unrecognized programs
When restoring Chrome’s settings doesn’t help, an installed application could be at fault. You need to search your computer for unwanted programs and delete the ones that seem suspicious or the ones you don’t need.
The process is different depending on what operating system you use. Below, you’ll find steps on how to delete programs on Windows and MacOS.
-
Find the Search bar on the taskbar, and type Control Panel. Select it.

-
Under Programs and Features select Uninstall a program.

-
Right-click on the program you want to remove. Press Uninstall or Uninstall/change.

- Follow the instructions.
-
In the dock at the bottom of your screen, click the Finder icon.

-
In the sidebar, click on Applications.

-
If the application is in a folder, open it and check if there’s no uninstaller. If there is one, click on it and follow the instructions. If there is no uninstaller or the application is not in a folder, click on the app and drag it to the Trash on the right side of the dock.

-
Once it is in the Trash folder, the app will be permanently deleted when you empty it.

Step 6. Remove temporary files
Sometimes malware is placed in the "temp" folder. This is because users often overlook it and don’t bother to scan it with an antivirus. Here’s how to remove temporary files on Windows and MacOS:
- Press Windows + R key combination to open the RUN window.
-
In the window, write %temp% and click OK.

-
You are now navigated to the temporary file folder. Delete all of the files and folders in this destination.

-
Right-click on your Recycle Bin and press Empty Recycle Bin.

- Close all of your applications.
-
Click the Finder icon in the dock.

-
Press Shift+Cmd+G on your keyboard to open the Go to the folder section. Type ~/Library/Caches/ and click Go.

- Choose the unnecessary files and drag them to the Trash folder. Make sure you only remove the files that are not important.
-
Empty the Trash folder.

How to prevent Windows from installing unwanted apps?
It can be very tiring to keep getting malware on your device. Luckily, you can take a few steps to ensure that your device doesn’t get infected anymore:
- Get a reliable antivirus that performs regular scans and offers real-time protection. This way, not only are you going to avoid downloading suspicious files, but your antivirus will also inform you about harmful websites.
- Verify the trustworthiness of the apps you download. Harmful software can be hidden in shady websites, so be cautious and try to download files only from official websites.
- Make sure you update your device and software. This is important because updates can include security patches that older versions lack.
- Use a safe web browser. Yes, a web browser also plays a part when it comes to protection. Some of them offer safety features, such as phishing and malware protection, or add-on installation warnings.
Video tutorial
If you're tired of reading, check out our comprehensive video tutorial on how to remove Yahoo Search from Chrome.
Conclusion
If Yahoo keeps taking over your searches, changing the default search engine alone usually isn’t enough. The solution lies in removing whatever is forcing the change, whether that’s an extension, installed program, or other unwanted software, and only then resetting Chrome to normal.
If Yahoo still returns after you’ve done all that, a full antivirus scan can help find the responsible adware or browser hijacker that’s harder to locate manually. If you want to try Norton before committing, you can always download the program and try it with the 60-day money-back guarantee.
Once the redirect is gone, keep your browser, operating system, and security software updated. I’d also leave real-time antivirus protection enabled, since it can block malicious extensions, bundled software, and similar threats before they get a chance to change your browser settings again.
More malware removal guides from Cybernews:
How to remove Yahoo Search from Mac
How to stop pop-up ads on Android
How to remove malware from Mac
FAQ
What happens if I uninstall Google Chrome?
If you uninstall Google Chrome, it doesn’t automatically delete malware. Your device can still have malicious programs installed on the system. That means that even if you download a different web browser, a browser hijacker can still change your settings.
Why is my browser redirected to Yahoo Search?
Your browser is redirected to Yahoo Search because your device is infected with malicious threats. The quickest way to remove this virus is to scan your device with an antivirus – Norton 360 is my top recommendation for detecting and removing threats that could be changing your browser settings.
What’s the best antivirus to remove the Yahoo redirect from Chrome?
For removing the Yahoo redirect from Chrome, I recommend Norton 360 or Bitdefender. Norton is my top all-in-one pick thanks to its malware protection, real-time security, and browser threat blocking, while Bitdefender delivered the strongest overall protection results in our latest testing and starts at just $12.99/year.