How to share a VPN
Our in-house cybersecurity experts and journalists, renowned for major reports like The Mother of All Breaches, conduct transparent, unbiased VPN testing and in-depth analysis.
With 750+ articles crafted based on real-world research, we empower readers to make informed purchasing decisions through first-hand expertise.
Learn more

You don’t need VPN software installed on every device to get its benefits. Sharing your VPN connection lets you extend the same protection and an IP address to other devices that don’t support VPN software. This includes various smart TVs, gaming consoles, and similar gadgets that can’t run VPN apps directly.
Below, I'll walk through the three main ways to share a VPN connection: via router, Ethernet, and Wi-Fi.
How to share a VPN in 5 steps: quick guide

- Install and connect to a VPN on a device that supports connection sharing (e.g., Windows PC, macOS, or a properly configured router)
- On that device, turn on a Wi‑Fi hotspot or Internet Sharing
- In network settings, share the VPN interface with the hotspot interface (Internet Connection Sharing or equivalent)
- Set a strong password for the hotspot
- Connect your non-VPN device to this hotspot and verify its IP address/location via an IP lookup site
VPN sharing works differently depending on your device. On Windows or macOS, you usually need to enable Internet Connection Sharing (or Internet Sharing on Mac) and route the hotspot through the VPN adapter, and not every VPN protocol/app exposes a shareable adapter. On Android and iOS, most built‑in hotspots don’t pass traffic through the VPN tunnel at all, so your tethered devices may stay unprotected unless you use advanced workarounds (like root, special proxy/tethering apps) or simply install the VPN directly on each device. If you want a more reliable, set-and-forget setup for multiple devices, running the VPN on your router or a dedicated Wi‑Fi box is often more convenient than juggling per‑device hotspots – you’ll find the corresponding guides below.
Why might you need to share a VPN?
Sharing a VPN connection lets you use VPN protection on devices that can't run the app themselves. Here’s what it actually helps with — and where it runs into limits:
- Online security and privacy. Each device connected to Wi-Fi is a potential entry point for snoopers. Sharing a VPN masks your online activity on devices like a gaming console or smart TV, not just your laptop.
- More streaming/gaming libraries. Since most streaming or gaming gadgets don’t support VPN software, sharing a VPN can make them appear to connect from another country, thus unlocking more streaming and gaming libraries with your existing account.
- Reduced DDoS exposure. Some games (especially peer-to-peer titles like Call of Duty and console party chat) expose your real IP address to other players mid-match, which is how booter services are used in gaming DoS/DDoS attacks. Routing that connection through a VPN hides your real IP address behind the VPN server's IP address, making it harder for other players to target your home connection directly. However, games that use dedicated servers instead of peer-to-peer connections already hide your IP address from other players, so a VPN’s usefulness here can vary by title.
- Less ISP throttling. If you have noticed that your connection spontaneously slows down during data-heavy activities, your internet service provider may be throttling specific traffic. A possible reason is that the ISP has a proprietary streaming service, which is how it forces you to use its service. However, a VPN can hide your online activity and stop the ISP from throttling your speeds.
- Potentially cheaper subscriptions. Game and streaming prices vary by country. Connecting through a server in a cheaper country can get you access to a lower price — but you still will need local billing information to finalize the purchase, not just the IP address.
- Stretch your device limit further. Most VPN plans cap how many devices can connect at once. When you share a VPN through a router, every device behind that router only counts as the router's single connection. This way, you can cover any number of smart TVs, consoles, and other devices on your home network without exceeding your plan's device limit.
- Protect gadgets on untrusted networks while traveling. If you bring a streaming stick, game console, or e-reader to a hotel or dorm with shared Wi-Fi, those devices usually can't run a VPN app on their own. But if you share a VPN from your laptop hotspot, they get the same protection on that network as your VPN-capable devices do.
Here's a closer look at what sharing a VPN actually gets you – and where – for each of these use cases:
| Use case | What a VPN can do | What a VPN cannot do |
| Unlock more streaming libraries on a smart TV/console | Make the device appear to connect from another country – useful if you already have an account | Provide a local payment method or billing address, which most services require for a fresh sign-up |
| Access region-locked games or game pricing | Make your connection appear to come from another country at the IP address level | Change your console/store account region – that's usually what actually determines your catalog and price, and it requires its own setup |
| Reduce DoS/DDoS exposure while gaming | Hide your real IP address from other players in peer-to-peer games | Guarantee full immunity or add much benefit on games that already use dedicated servers |
| Avoid ISP throttling | Encrypt traffic so your ISP can't identify and selectively slow it | Increase your bandwidth beyond what your internet plan provides |
| Get cheaper subscriptions | Make traffic look like it's from a cheaper country | Bypass the local payment method most services require. Moreover, doing this can violate the service's terms, risking account suspension |
| Protect gadgets on hotel/shared Wi-Fi | Extend the same encryption to any device that can't run a VPN app itself via your laptop hotspot | Make the device itself capable of running a VPN app – you still need a device with native VPN support to share from |
Best 3 VPNs for sharing
A reliable VPN matters most here, since it’s doing the double duty – protecting your main device and everything you share the connection with. These three are my top three VPN picks for router setup and hotspot sharing:
- NordVPN – best overall VPN for router compatibility and OpenVPN configuration support, which is what you'll need for hotspot sharing (its default NordLynx protocol doesn't support that method — make sure to switch to OpenVPN first).
- Surfshark – this affordable and lightning-fast VPN holds up well on busy home networks, making it a strong pick if you’re sharing one connection across multiple streaming and gaming devices.
- IPVanish – best for covering lots of devices without extra setup, thanks to unlimited simultaneous connections and solid router support.
How a VPN connection can be shared: 3 methods
Sharing a VPN connection is easy if your devices support it, as nearly all VPN providers allow multiple connections. However, it gets more complicated if some of your home devices don’t support VPN apps. In this case, you must first set up a VPN on VPN-compatible gadgets.
- Share a VPN via a virtual router
- Share a VPN via Ethernet on Windows
- Share a VPN via Ethernet on macOS
- Share a VPN on Windows via Wi-Fi
- Share a VPN on macOS via Wi-Fi
Sharing a VPN via a virtual router
For those wanting a fast, stable network connection, the router is the best tool for VPN sharing. It also saves battery on individual devices, since they don’t need to keep a VPN app running in the background.
Below are the basic steps for setting up a VPN on a router and sharing the connection to your devices. I used NordVPN in my examples, but the overall process is the same with other providers as well.
- Download your VPN’s configuration files and pick a suitable server for your region
- Locate your router’s IP address (usually printed on a label on the device)
- Type that IP address into your browser’s URL bar, then log into the router’s admin panel with the router password – it should be written down next to the IP address
- In the router configuration interface, find a VPN client section (if there isn’t one, your router likely doesn’t support VPN)
- Upload your VPN’s OpenVPN configuration file, enter your VPN credentials, and save/apply the profile
- Connect your devices to this router and confirm the VPN is working by checking that their public IP address/location matches the VPN server
Sharing a VPN via Ethernet
Sharing a VPN via Ethernet is a more secure option. Firstly, if anyone tried to access your data via Ethernet, they would need physical access to it. With a VPN on the side, it becomes rather impossible to hack you.
However, keep in mind that to share a VPN via Ethernet, you need to have at least one Ethernet cable and a robust VPN. See how that works in detail below.
How to share a VPN via Ethernet on Windows
Learn how to share a VPN connection on Windows using Ethernet, following these steps:
-
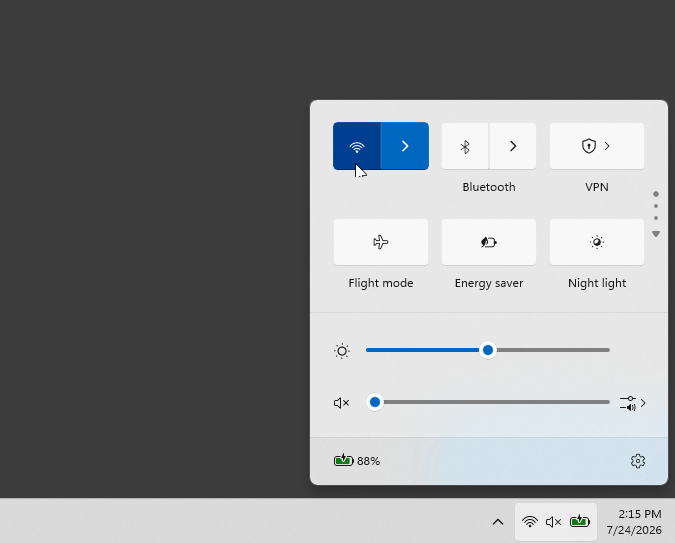
Make sure your Windows PC is connected to the internet through Wi-Fi
-
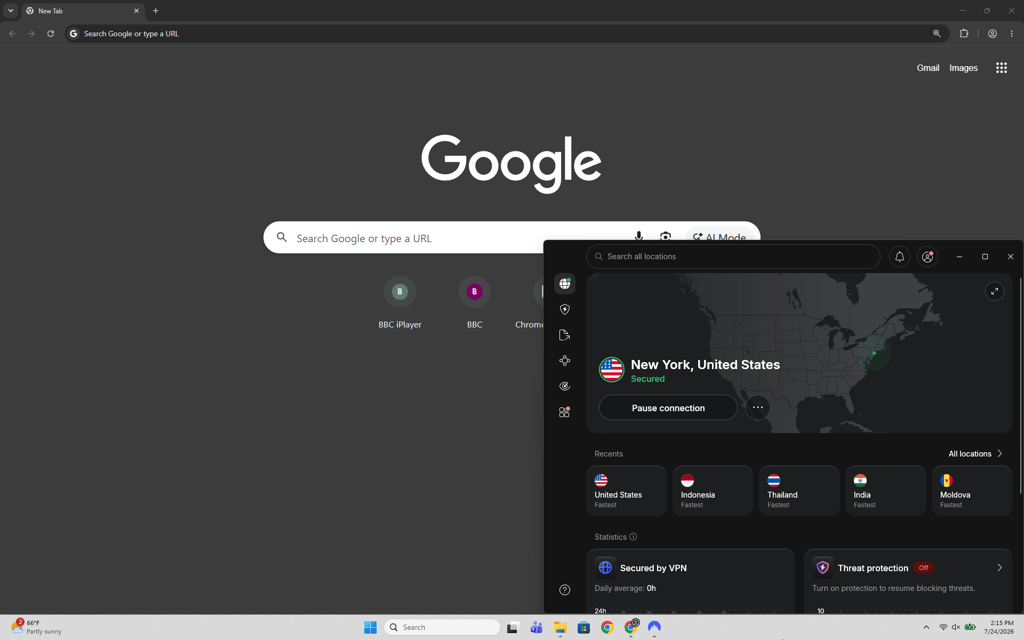
Launch the VPN app and connect to the server
- Connect your non-VPN device to your Windows computer using an Ethernet cable – you will probably need a USB-C to Ethernet adapter cable for a new laptop
-
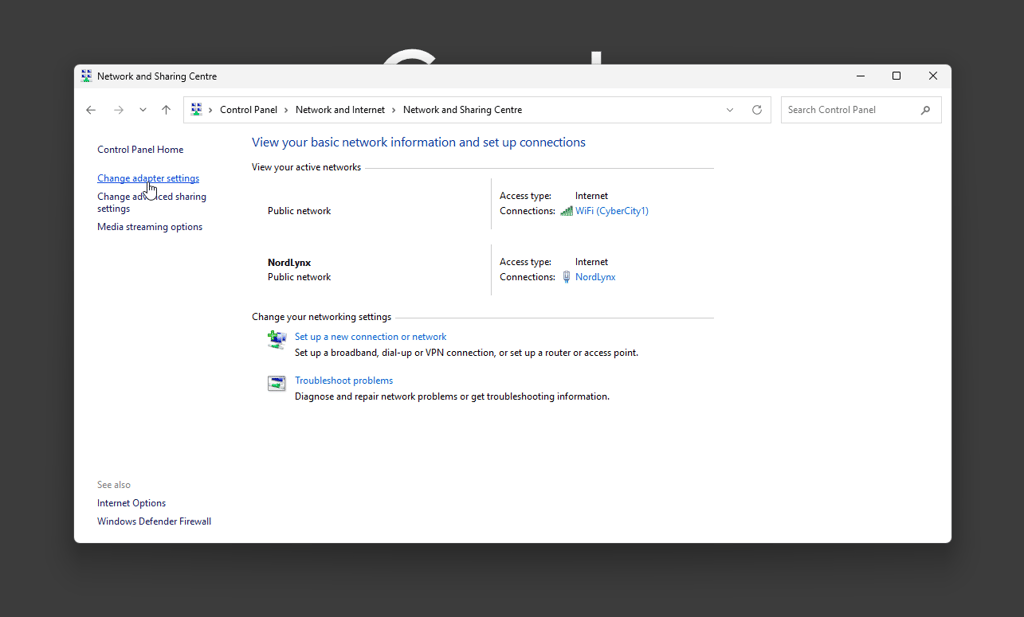
Open Settings → Network & internet → Advanced network settings → More network adapter options. This opens the classic Network Connections window
-
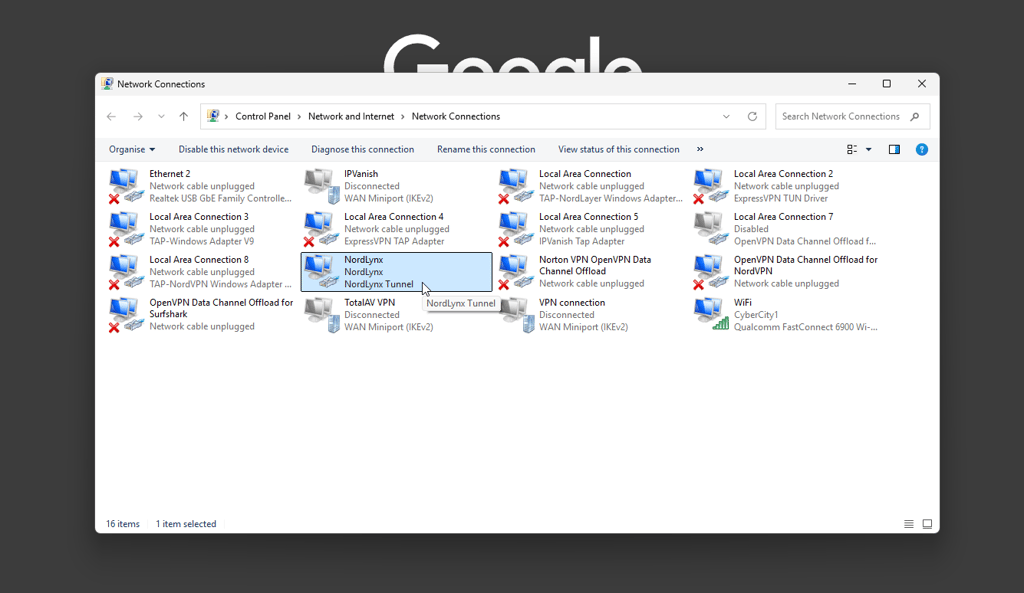
Locate your VPN adapter. Depending on the VPN, this might be: TAP-Windows Adapter (OpenVPN-based), WireGuard Tunnel, Wintun, or a VPN-specific virtual adapter. Note that for some modern VPNs, it may not be obvious because they use the Windows Filtering Platform instead of a virtual adapter
-
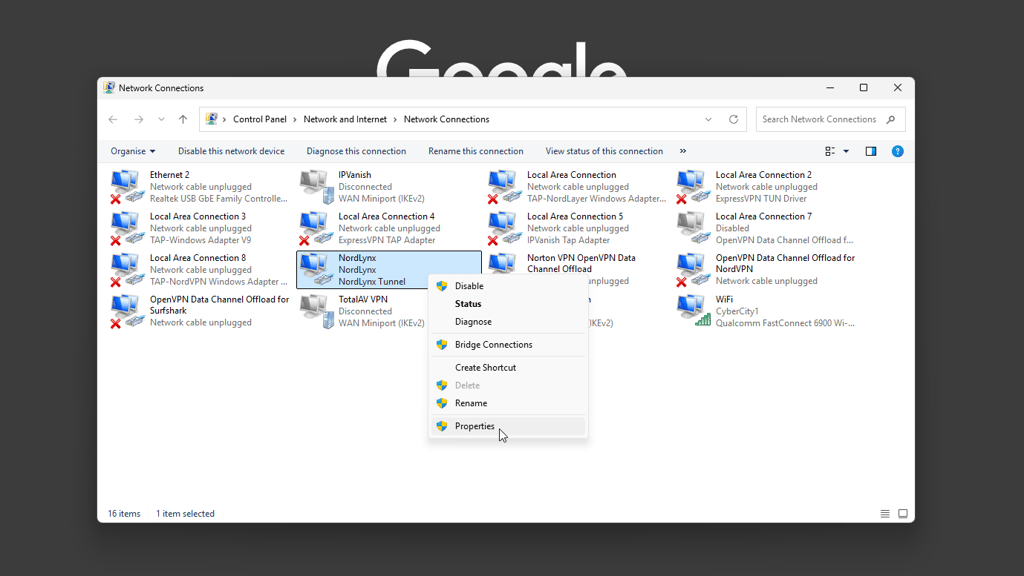
Right-click the VPN adapter (or, if no VPN adapter exists, sometimes the Wi-Fi adapter) and choose Properties
-
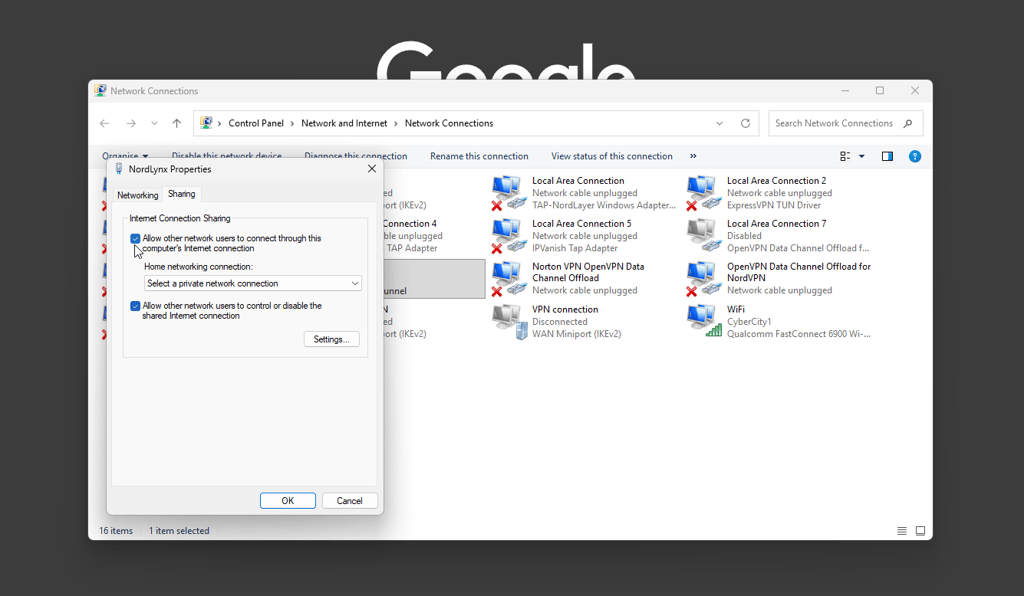
Open the Sharing tab and check the box for Allow other network users to connect through this computer’s Internet connection
-
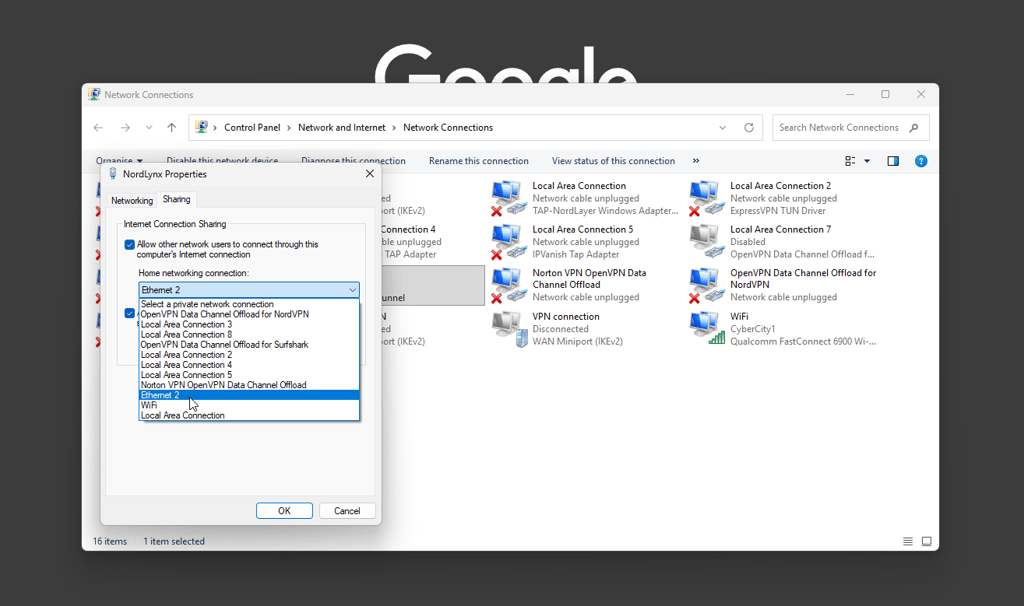
From Home networking connection, select your Ethernet connection adapter and click OK – your non-VPN device should now be sharing your Windows VPN connection
How to share a VPN via Ethernet on macOS
To use your Mac to share a VPN via Ethernet, complete the following steps:
- Install your VPN provider's macOS app, connect to a VPN server, and verify that your Mac has internet access through the VPN
- Connect your Mac to the internet using Wi-Fi or another network interface
- Connect the device you want to protect to your Mac using an Ethernet cable – if your Mac doesn't have a built-in Ethernet port, use a USB-C or Thunderbolt Ethernet adapter
- Open System Settings → General → Sharing
- Turn on Internet Sharing, then click Configure or the ⓘ button, depending on your macOS version)
- Under Share your connection from, select your VPN connection. Depending on your VPN provider, it may appear with the VPN app's name or as a virtual network interface. Some VPN apps expose their own interface for Internet Sharing, while others may not support this feature
- Under To devices using, select Ethernet
- Click Done, then enable Internet Sharing if it isn't already turned on
- On the connected device, configure the network adapter to obtain an IP address automatically (DHCP) – it should now access the internet through your Mac's VPN connection
Not every VPN app on Mac can be shared over Ethernet. If your VPN connection doesn’t show up in the Internet Sharing list or the other device can’t get online, try a different VPN protocol or check your provider’s help pages. Some apps that use Apple's Network Extension framework or extra features like a kill switch simply can’t be shared this way, so you may need to switch settings or use another device to share the VPN.
Sharing a VPN using Wi-Fi
Wi-Fi is a more flexible VPN port option, as it’s easier to connect multiple devices to it without extra cables. However, it’s generally less stable and less secure than a wired Ethernet connection.
Sharing a VPN on Windows using Wi-FI
See how to share a VPN using a Windows device below:
- Connect your Windows PC to the internet
-
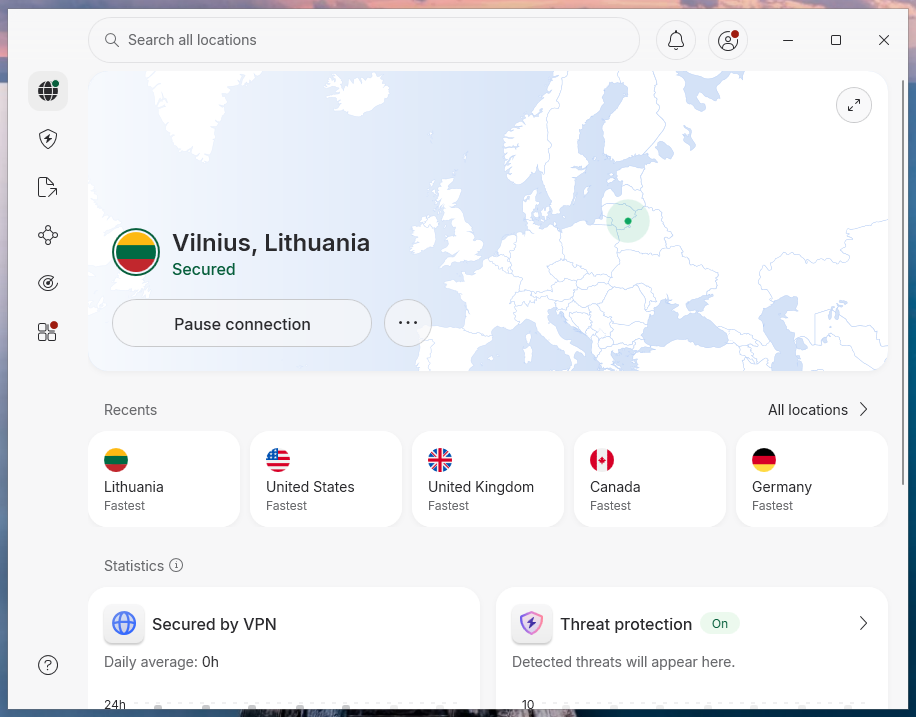
Launch your VPN app and connect to a VPN server
- Open Settings → Network & internet → Mobile hotspot
-
Toggle the Mobile hotspot ON
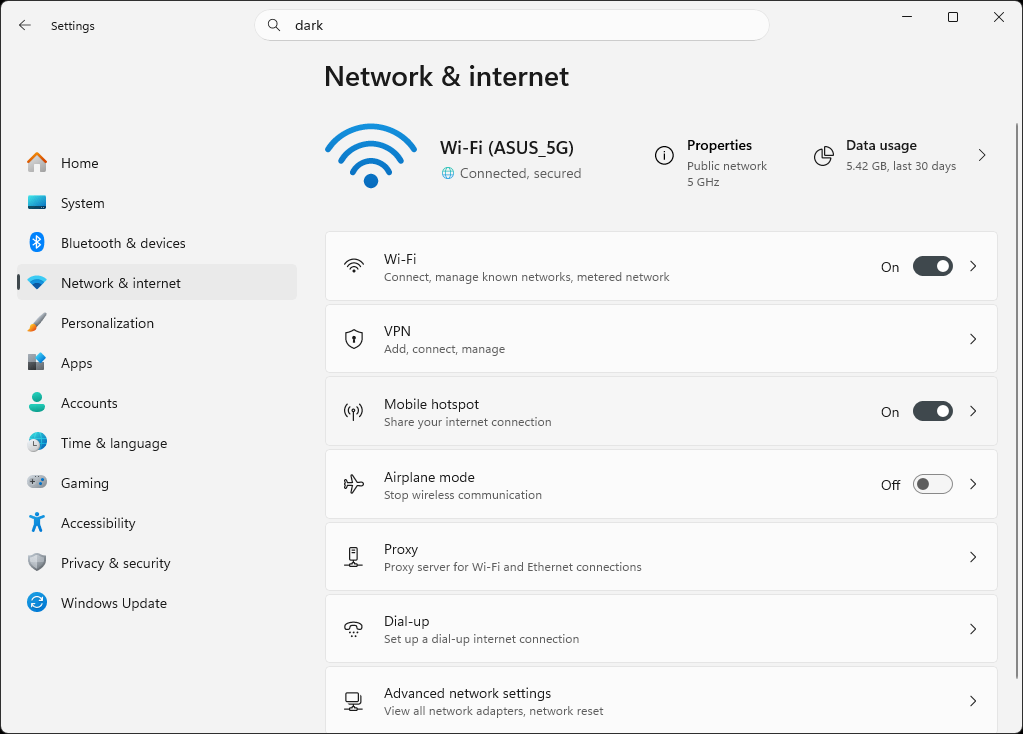
- Under Share my internet connection from, select Wi-Fi
-
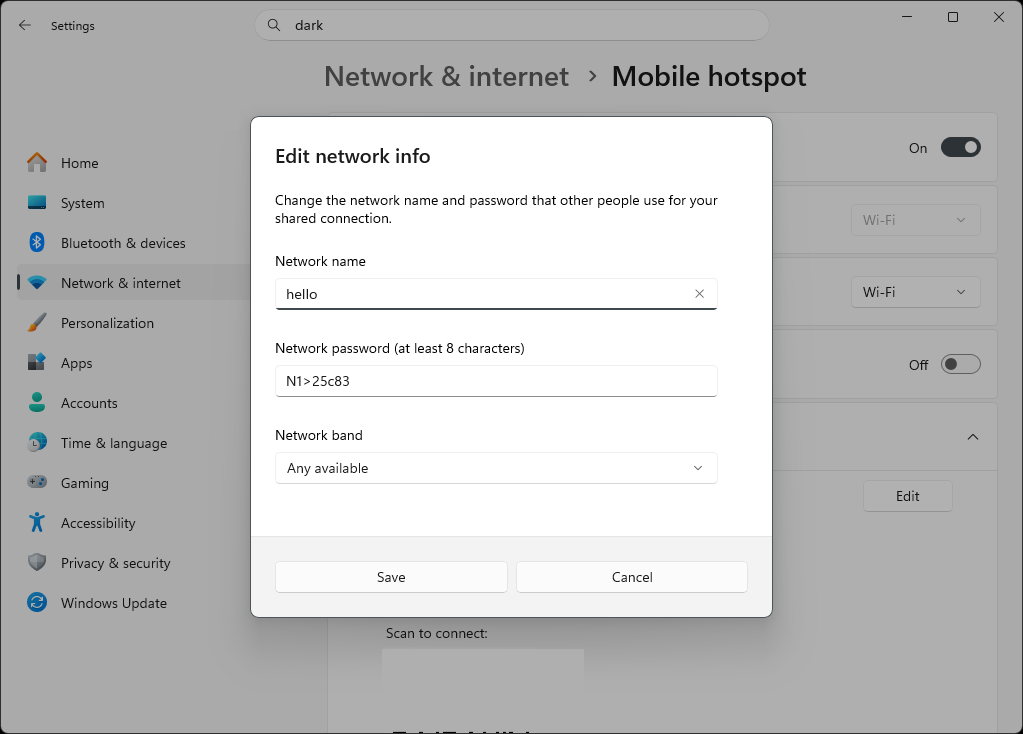
Click Edit to create a name and password for your new network
-
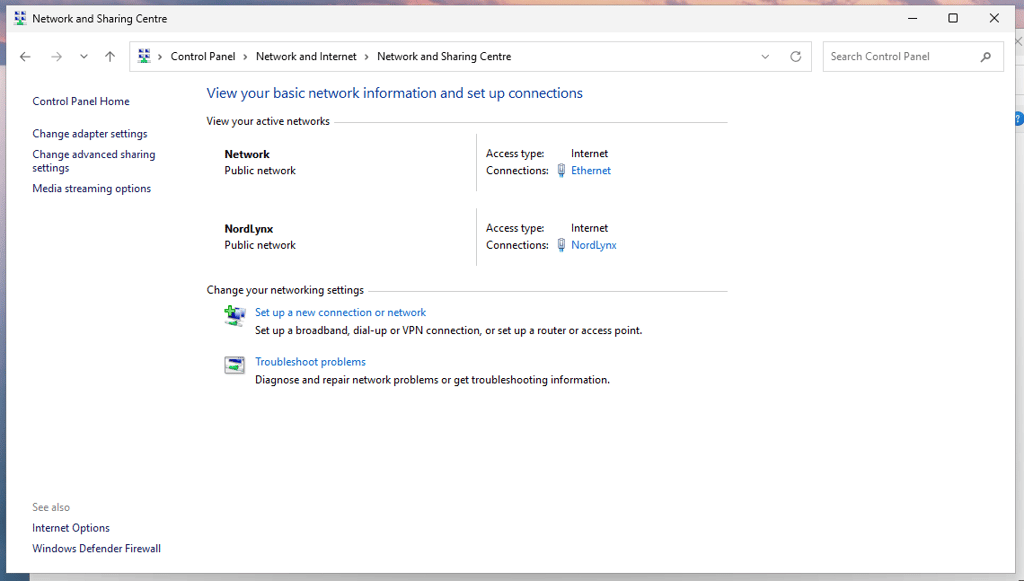
Open Control Panel → Network and Internet → Network and Sharing Center → Change adapter settings
-
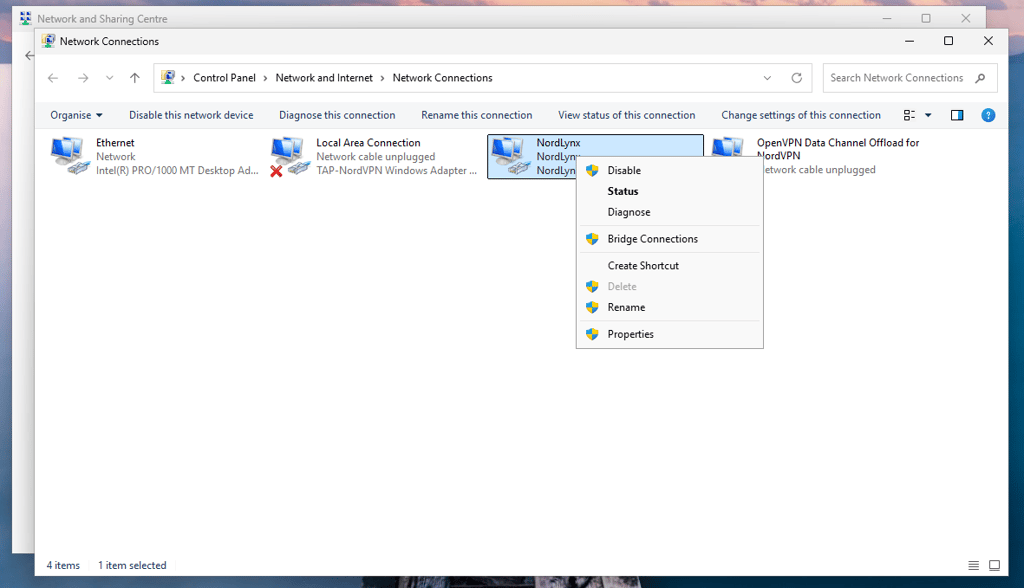
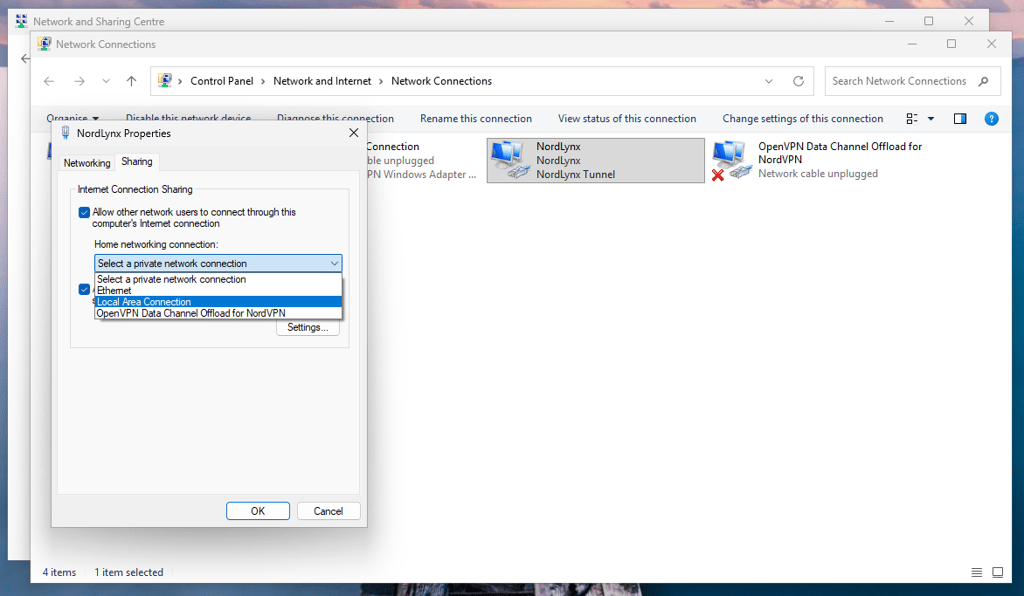
In the Network Connections window, locate your VPN adapter. Depending on your VPN provider, it may be named TAP-Windows Adapter, WireGuard Tunnel, Wintun, or another VPN-specific virtual adapter. Right-click the VPN adapter and select Properties
-
Choose the Sharing tab, then under Home networking connection, select the Microsoft Wi-Fi Direct Virtual Adapter (it may appear as Local Area Connection, Local Area Connection 10, or another numbered Local Area Connection entry, depending on your Windows version) and click OK
- Connect your other, non-VPN device to the Wi-Fi hotspot you created
Sharing a VPN on macOS using Wi-FI
Share a VPN connection via Wi-Fi on macOS devices following the guide below:
- Install your VPN provider's macOS app and connect to a VPN server
- Open System Settings → General → Sharing
- Click the ⓘ button next to Internet Sharing or Configure, depending on your macOS version
- Under Share your connection from, select your VPN connection – depending on your VPN provider, it may appear as the VPN app's network interface
- Under To computers using, select Wi-Fi
- Click Wi-Fi Options, then: enter a Network Name → choose a Channel (or leave the default) → select WPA2/WPA3 Personal (or the strongest available security option) → create a strong password → click Done
- Turn on Internet Sharing and confirm when prompted
- On the device you want to protect, connect to the new Wi-Fi network you created – all internet traffic from that device will be routed through your Mac's VPN connection
On macOS, VPN sharing over Wi‑Fi works much like sharing over Ethernet: not every VPN app supports it. If your VPN connection doesn’t show up in the Share your connection from menu or connected devices can’t get online, it’s likely your VPN just can’t be shared this way.
Is sharing a VPN safe?
Yes, sharing a VPN is safe from a technical standpoint, but two things affect it in practice: the provider you choose and the people you share it with.
On the provider side, look for one with a no-logs policy that's been independently audited, and check whether it's had any past breaches or logging incidents. Read the privacy policy before subscribing — a trustworthy provider makes this easy to find and understand, not buried in legal language.
Everyone using your shared connection should also know the provider's terms, not just you. That includes one crucial thing worth being aware of: letting the VPN connection get misused for illegal activities can get you banned from servers or have your account suspended. Also note that while a router-shared connection typically counts as one device, individually shared logins on separate devices usually do count against your VPN plan’s device limit.
In short: sharing is safe as long as you trust the provider and that everyone on the connection uses it responsibly.
Conclusion
Although most VPN providers support several or unlimited simultaneous connections, that doesn't solve every case – for example, devices that can't run a VPN app at all, like an Apple TV, Xbox, or Amazon Fire TV Stick. Sharing your VPN connection over Wi-Fi, Ethernet, or a router solves that gap.
Follow the guides above, and you can have your encrypted connection covering every device on your home network within minutes. Just remember what it does and doesn't change: VPN can still provide the same IP-masking and encryption but not a bypass for account, payment, or region restrictions that live outside the IP address layer.
One last thing: make sure anyone else using your shared VPN connection also knows the provider's terms and understands that irresponsible activity on it can get the connection banned or suspended for everyone using it.
FAQ
Can I share my VPN connection?
Yes, you can share your VPN connection. By installing a VPN client on your computer or router, you can share an encrypted connection to non-VPN devices. However, keep in mind that only a reputable VPN, such as NordVPN, will provide a fast, secure connection.
What does it mean to share a VPN?
Sharing a VPN means setting up a VPN on a router or other VPN-compatible devices and allowing non-VPN devices to use that encrypted connection. This way, you can have VPN benefits on gadgets that don’t run VPN apps themselves, including smart TVs, gaming consoles, streaming sticks, e-readers, and other home devices.
How can I share my VPN with another phone?
You can share your VPN with another phone simply by installing the VPN app on it and signing in with the same account. Most VPN providers allow numerous simultaneous connections: for example, NordVPN allows up to 10, while Surfshark has support for unlimited devices. That way, a single subscription can secure several phones and other devices at the same time.
Can 2 people use a VPN at the same time?
Yes, usually, 2 people can use a VPN simultaneously. However, to do this, your VPN provider must allow several or unlimited simultaneous connections, so you wouldn’t get disconnected when connecting to a VPN on different devices at once.
Can you share NordVPN?
Yes, you can share NordVPN. It allows up to 10 simultaneous VPN connections on devices that support VPNs. And you can also share the connection by installing it on a router or other VPN-compatible gadgets.