How to share a VPN
Our in-house cybersecurity experts and journalists, renowned for major reports like The Mother of All Breaches, conduct transparent, unbiased VPN testing and in-depth analysis.
With 750+ articles crafted based on real-world research, we empower readers to make informed purchasing decisions through first-hand expertise.
Learn more
Sharing a VPN connection is a necessity to protect devices that don’t support VPN software. This includes various smart TVs, gaming consoles, and other gadgets incompatible with modern apps.
Luckily, you can share your VPN connection from another device if you take the appropriate steps. So, let’s not waste any more time and head into the three main ways of sharing a VPN connection.
How to share a VPN in 5 steps

- Download and install a robust VPN. We recommend NordVPN, now 75% OFF
- Ensure your VPN-compatible device is connected to Wi-Fi
- Open the VPN app and connect to the server
- Create a Wi-Fi hotspot
- Connect your non-VPN device to the secured hotspot
Why might you need to share a VPN?
Sharing a VPN connection is an excellent way of using your VPN to its fullest potential. Here’s a rundown of the main benefits of doing so:
- Online security and privacy. Each device connected to Wi-Fi is like a highway to your data for snoopers. Hence, it’s crucial to mask your online activity not only on your phone, laptop, or tablet but also on other home devices, such as your gaming console or smart TV.
- Unblocked content. Most streaming or gaming gadgets don’t support VPN software, so you can only access content from your region. Yet, by sharing a VPN with those devices, you will be able to enjoy various Netflix libraries and play otherwise restricted video games.
- Avoid DDoS attacks. Using a VPN on your gaming console will protect you from DDoS attacks, which can disrupt your gaming sessions and cause other cybersecurity issues.
- Better connection speed. If you have noticed that your connection spontaneously slows down during data-intensive activities, it’s most likely that your ISP is throttling the connection. A possible reason for this is that the ISP has a proprietary streaming service, and it’s how it forces you not to use other options. However, a VPN can hide your online activity and stop the ISP from throttling your speeds.
- Save money. Due to taxes and other factors, each country has different price ranges for video games or streaming services. By connecting to a VPN server in a cheaper country, you can get your favorite games and streaming service subscriptions noticeably cheaper.
How a VPN connection can be shared: 3 methods
Sharing a VPN connection is easy if your devices support it, as nearly all VPN providers allow multiple connections. However, it gets more complicated if some of your home devices can’t have a VPN app installed. In this case, you must first set up a VPN on VPN-compatible gadgets.
- Share a VPN via a virtual router
- Share a VPN via Ethernet on Windows
- Share a VPN via Ethernet on macOS
- Share a VPN on Windows via Wi-Fi
- Share a VPN on macOS via Wi-Fi
As expected, a reliable VPN here is crucial. But we’re not leaving you alone in this. We have picked the top 3 VPNs that ensure excellent performance; they bypass geo-blocks and work with all major operating systems.
- NordVPN – one of the best VPNs to use with routers and other devices. It offers the NordLynx tunneling protocol to ensure lightning-fast and secure connections. The starting price is only $3.49/month, and you can use the 30-day money-back guarantee to test the service risk free.
- Surfshark – this lightning-fast VPN unblocks all popular streaming services, offers advanced features, and is one of the cheapest options available – from $2.49/month. With a 30-day money-back guarantee, you can test it before committing long term.
- IPVanish – where security meets performance – that’s how we describe this provider. With it, you can enjoy Netflix US wherever you are for $2.19/month. It also has a 30-day money-back guarantee.
Now that you have a list of great VPN providers, all that’s left is to learn how to share a VPN connection. Read on and find detailed guides below.
Sharing a VPN via a virtual router
For those wanting a fast and stable network connection, the router is the best tool to share a VPN. Moreover, this way you can also save your device’s battery, as you don’t need to have the VPN app running in the background all the time.
Below are the steps for setting up a router VPN and sharing the connection to your devices. We recommend using NordVPN.
- Download VPN configuration files and find the best NordVPN server for you
- Locate your router’s IP address, which usually can be found on the back or bottom of the router
- Type the IP address into your browser’s URL bar. Then, type in the router’s password, which should be written down next to the IP address
- Open the router’s configuration interface and find the option for a VPN client
- Upload your VPN’s OpenVPN configuration file
- Complete any necessary setup steps and connect any of your devices
Sharing a VPN via Ethernet
Sharing a VPN via Ethernet is the most secure option. Firstly, if anyone tried accessing your data on Ethernet, they would need physical access to it. With a VPN on the side, it becomes rather impossible to hack you.
However, keep in mind that to share a VPN via Ethernet, you need to have 2 Ethernet cables and a robust VPN (we recommend NordVPN). But we will show you everything in detail below.
How to share a VPN via Ethernet on Windows
Learn how to share a VPN connection on Windows using Ethernet, following these steps:
- Make sure your Windows PC is connected to the internet through Wi-Fi
-
Launch the VPN app and connect to the server

- Connect your device without a VPN to your Windows computer through the Ethernet cable. You will probably need a USB-C to Ethernet adapter cable for a new laptop
-
Go to Start -> Settings -> Network & Internet ->Status

-
Click on Change adapter options

-
In the Network connections window, find a network with your VPN connection. The description can include the name of your VPN provider or words such as “TAP-Windows-adapter.” Right-click it and select Properties

-
Choose the Sharing tab and check the box for Allow other network users to connect through this computer’s Internet connection

- Under Home networking connection, select your Ethernet connection and click OK. Your device without a VPN should now be sharing your Windows VPN connection


How to share a VPN via Ethernet on macOS
To use your Mac to share a VPN via Ethernet, complete the following steps:
- To manually configure your VPN connection on Mac, go to System Preferences -> Network
- Click the plus icon to create a new VPN connection in the Interface section. Set the Service Name to whatever you like, and in the VPN Type option, select L2TP over IPSec. Click Create
- Set Configurations to Default and enter the preferred VPN server address
- Click on Identity Control Settings or Authentication settings, depending on the device, and enter your VPN account password. Also, enter the Shared secret, click OK, and then Apply
- Next, click Advanced. And check the box for Send all traffic over VPN connection, click OK
- Click Connect to establish a VPN connection on your Mac
- Connect your device without a VPN to your Mac using an Ethernet cable
Sharing a VPN using Wi-Fi
Wi-Fi is a more flexible option as a VPN port, as it’s easier to connect multiple devices to it. However, it’s less secure than Ethernet.
Nevertheless, using the correct VPN will help you enjoy a secure and stable Wi-Fi connection. For this, we recommend NordVPN, as it uses advanced encryption and has little impact on your initial connection speed.
Sharing a VPN on Windows using Wi-FI
See how to share a VPN using a Windows device below:
-
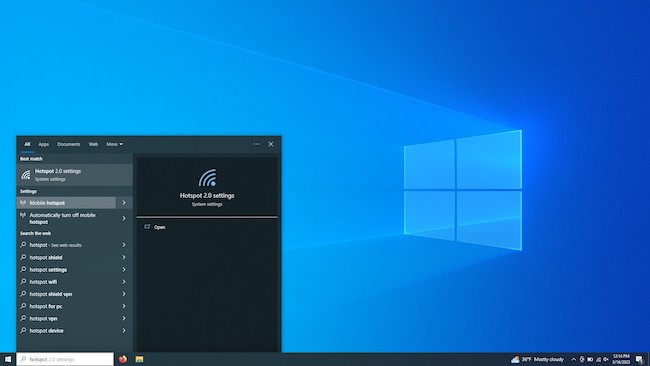
Find the Mobile hotspot in the Settings section

-
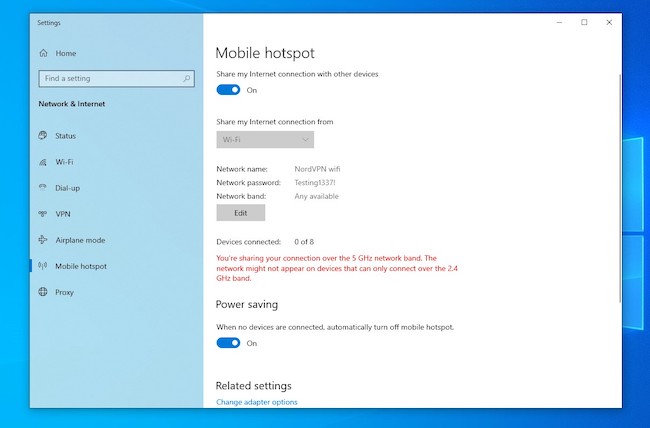
Toggle the Mobile hotspot ON

- Under Share my internet connection from, select Wi-Fi
-
Click Edit to create a name and password for your new network

-
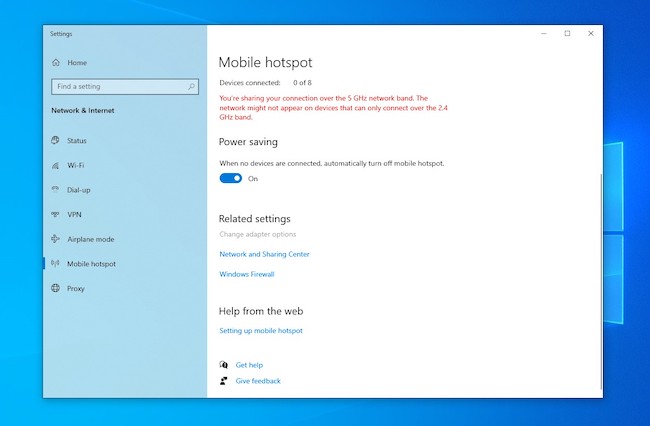
Under Related settings, click on Change adapter options

- In the Network connections window, you will see Local Area Connection*. This is your created mobile hotspot
-
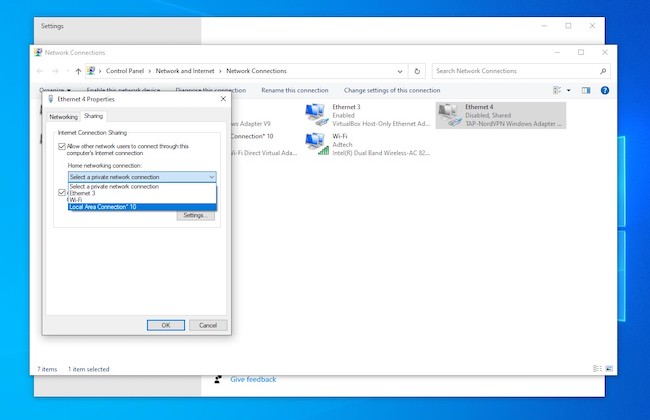
In the same window, find a network with your VPN connection. The description usually includes the name of your VPN provider or something like “TAP-Windows-adapter: Right-click it and select Properties
-
Choose the Sharing tab and check the box for Allow other network users to connect through this computer’s Internet connection

- Under Home networking connection, select the created mobile hotspot – Local Area Connection* – and click OK
-
On your Windows device, launch the NordVPN app and connect to a server location of your choice
- Connect your other non-VPN device to the Windows hotspot that you have just created

Sharing a VPN on macOS using Wi-FI
Share a VPN connection via Wi-Fi on macOS devices following the guide below:
- Manually configure your VPN connection on Mac. Go to System Preferences -> Network
- Click the plus icon to add a new VPN connection in the Interface section. Set the Service Name to what you like, and in the VPN Type option, select L2TP over IPSec. Click Create
- Set Configurations to Default and enter the preferred VPN server address
- Click on Identity Control Settings or Authentication settings, depending on the device, and enter your NordVPN account password. Also, enter the Shared secret, tap OK, and then Apply
- Next, click Advanced and check the box for Send all traffic over VPN connection. Tap OK
- Click Connect to establish a VPN connection on your Mac
- Connect your device without a VPN to your Mac using an Ethernet cable
- Go to Systems Preferences -> Sharing
- Open the drop-down menu next to the Share your connection from and choose the VPN connection you have just set up
- Next to the To computers using, check your Wi-Fi
- Go to the Wi-Fi Options. Here you can name the network and set the password. Click OK
- From the Sharing menu on the left, check the box Internet Sharing
Is sharing a VPN safe?
Yes, sharing a VPN is safe. However, it also depends on the people using the connection and the VPN provider you pick.
Firstly, you must ensure the VPN you choose is entirely anonymous. It should follow an audited no-logs policy and have no unsolved dark spots in the past. It’s recommended that you thoroughly read the VPN’s privacy policy before subscribing to it. However, the most secure VPNs will make it easy for you to quickly find the most crucial information.
But you are not the only one who should be introduced to the provider’s privacy policy. Every other person who plans to use your encrypted network should also be aware of the privacy terms and conditions.
You should also remember that sharing a VPN is safe if you act responsibly around it. Let’s say you start compromising other people's privacy and security or simply get involved in criminal activity. The safety of shared VPN ends at this point, as you can easily get banned from specific servers and more.
Conclusion
Although most VPN providers support several or unlimited simultaneous connections, this option isn’t always a solution to the issue. For example, if you want to use a VPN on an Apple TV, Xbox, Amazon Fire TV Stick, and other devices that can’t have a VPN installed.
Nevertheless, there are ways to solve this problem. You can share your VPN using Wi-Fi, Ethernet, or a router. With a robust VPN, such as NordVPN, and detailed guides on sharing an encrypted connection, you can enjoy unblocked content and secure browsing on all your home devices within minutes.
Yet, note that it’s important to inform other users who are planning to use your VPN connection about the consequences of irresponsible cyber activity.
FAQ
Can I share my VPN connection?
Yes, you can share your VPN connection. By installing a VPN client on your phone, computer, or router, you can share an encrypted connection to non-VPN devices. However, keep in mind that only a reputable VPN, such as NordVPN, will provide you with a fast and secure connection.
What does it mean to share a VPN?
Sharing a VPN means setting up a VPN on a router or other VPN-compatible devices and allowing non-VPN devices to use the encrypted connection. This way, you can have VPN benefits on devices like smart TVs, gaming consoles, streaming devices, and other home devices.
How can I share my VPN with another phone?
You can share your VPN with another phone by installing a VPN client on it. Most VPN providers allow numerous simultaneous connections; for example, NordVPN allows up to 10, while Surfshark has unlimited. So, by using a single account, you can secure multiple phones or other devices.
Can 2 people use a VPN at the same time?
Yes, usually, 2 people can use a VPN simultaneously. However, to do this, your VPN provider must allow several or unlimited simultaneous connections so you wouldn’t get disconnected when connecting to a VPN on different devices at once.
Can you share NordVPN?
Yes, you can share NordVPN. It allows you to have up to 10 simultaneous connections on devices that support VPNs. And you can also share the connection by installing it on a router or other VPN-compatible gadgets.


