How to delete your Facebook account
Being behind major reports like The Mother of All Breaches and RockYou2024, our in-house cybersecurity experts and journalists provide unbiased, real-world testing and in-depth analysis.
We maintain complete transparency by openly sharing our testing methodologies with our audience.
Learn more
Lowering exposure to social media and privacy concerns are now widespread, with many people searching for how to delete your Facebook account. According to Pew Research, 26% of Americans in 2018 removed the Facebook app from their phones in just one year – a phenomenon driven by data collection concerns and the need to reduce online clutter.
Today, Facebook has over 3 billion active users, but it’s becoming less popular among millennials and Gen Z. Many said they are parting ways with the platform due to negative content, mental-health strain, and unclear data practices.
As a Cybernews expert, I’ve prepared a guide with the exact steps you need to take to delete your Facebook account permanently on both a browser and the mobile app. I’ll also tell you what happens after deletion, how to cancel the request if needed, and alternatives like deactivation or memorialization.
How to delete your Facebook account

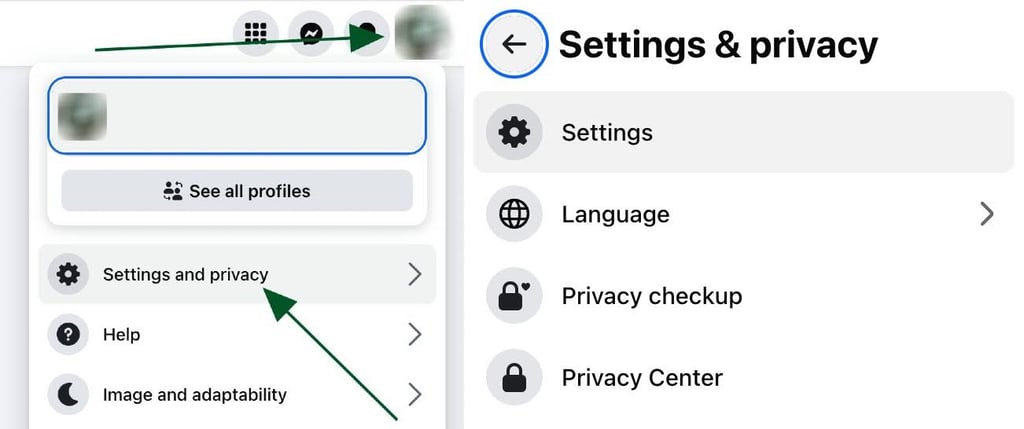
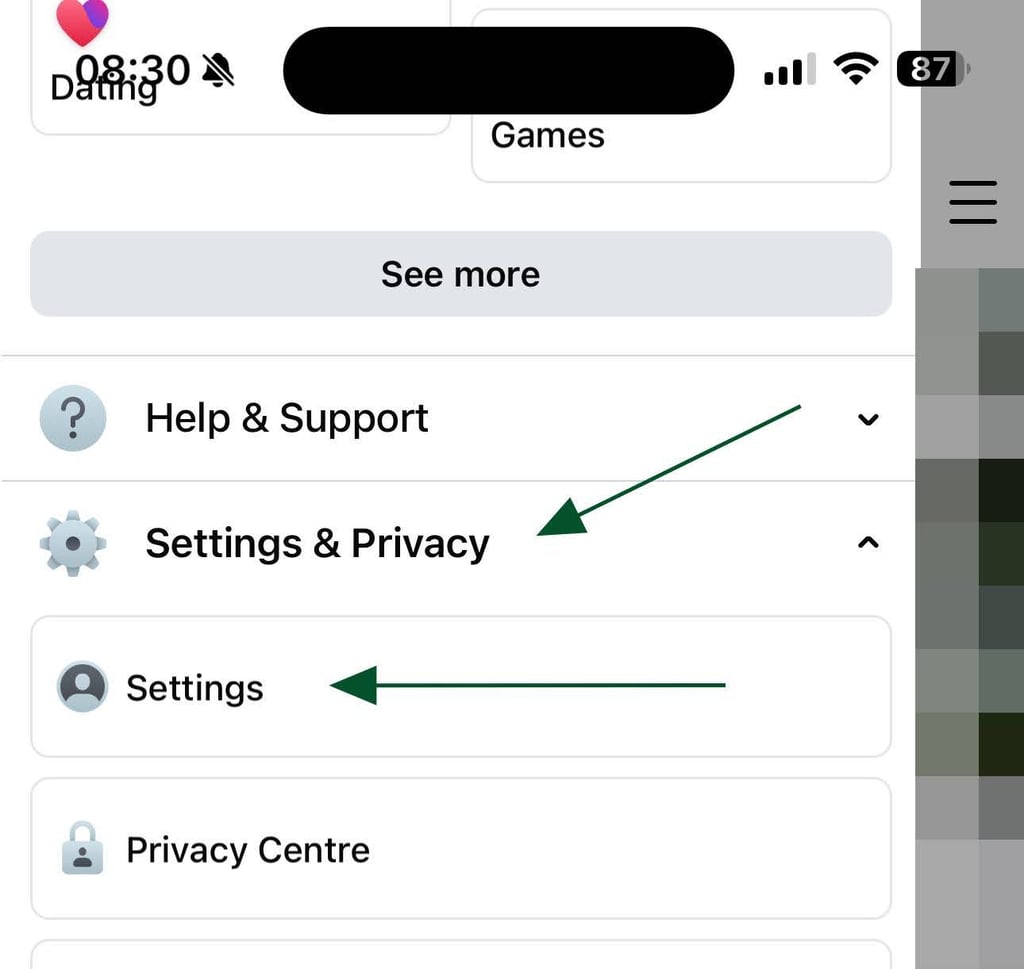
- Open Facebook > Profile picture > Settings & privacy > Settings
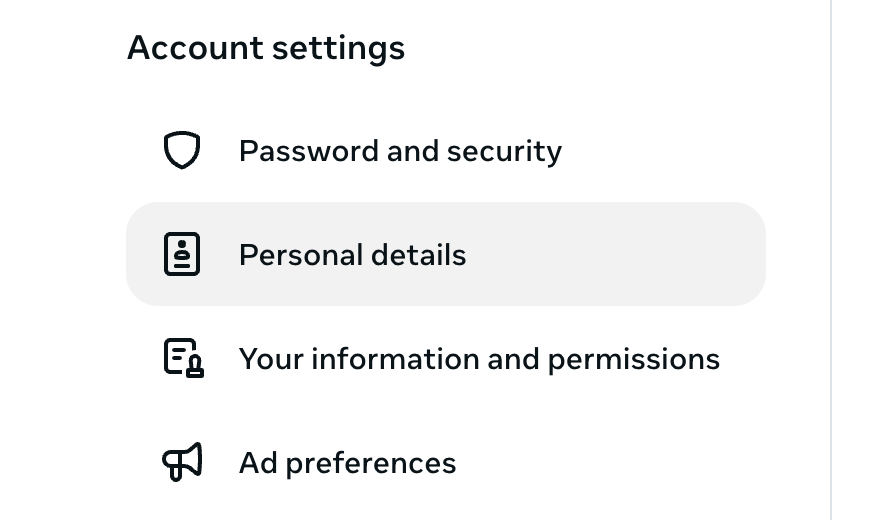
- Select Accounts Centre > Personal details
- Go to Account ownership and control > Deactivation or deletion
Before you delete: what to do first
Facebook accounts can hold years of memories and other important details. Before closing your account, back up that data. Download your photos, posts, contacts, and messages – with Facebook’s Download Your Information tool. Next, avoid getting locked out of your apps and websites that use Facebook Login – like your games or Spotify. Do this by switching login methods for apps and websites.
Finally, check your connected platforms like Instagram and Meta Quest to disconnect or transfer control – since deleting Facebook can also affect those accounts. Remember to protect your data and prevent losing access to other services before removing your Facebook profile.
How to delete your Facebook account
You can delete your Facebook account from any device in just a few minutes. The steps differ slightly depending on whether you’re on a desktop browser or the mobile app. Next, I’ve listed the full processes for each platform – with both the default Accounts Centre method and the fallback Facebook Settings path. I’ve drawn all this information purely from Facebook’s official account deactivation pages.
Browser
If you’re on a browser, you can delete your Facebook account through the Accounts Centre.
- Click your profile picture in the top right of Facebook
-
Select Settings and privacy, then click Settings
-
On the top left of your screen, click Accounts Centre

-
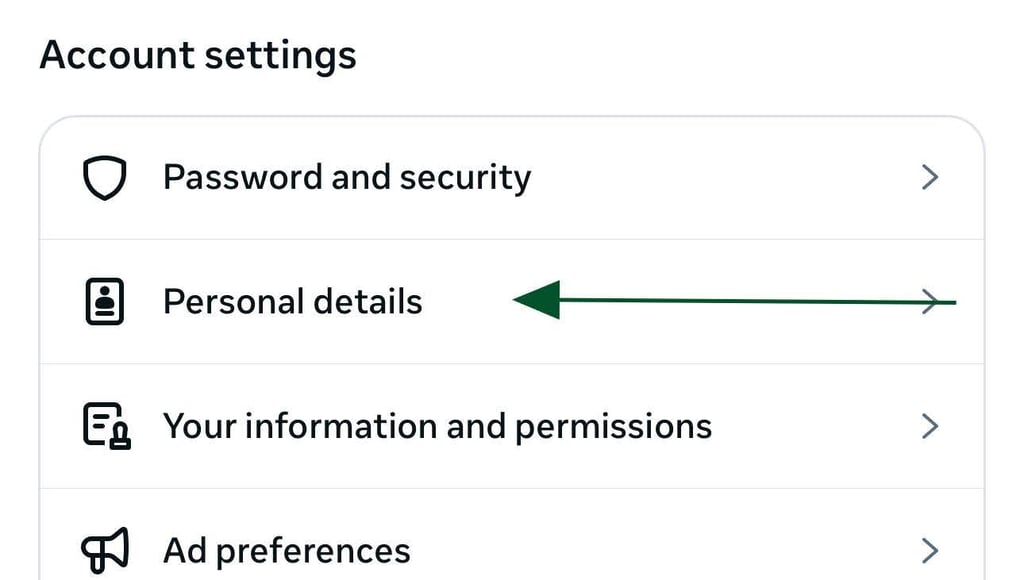
Under Account settings, click Personal details
-
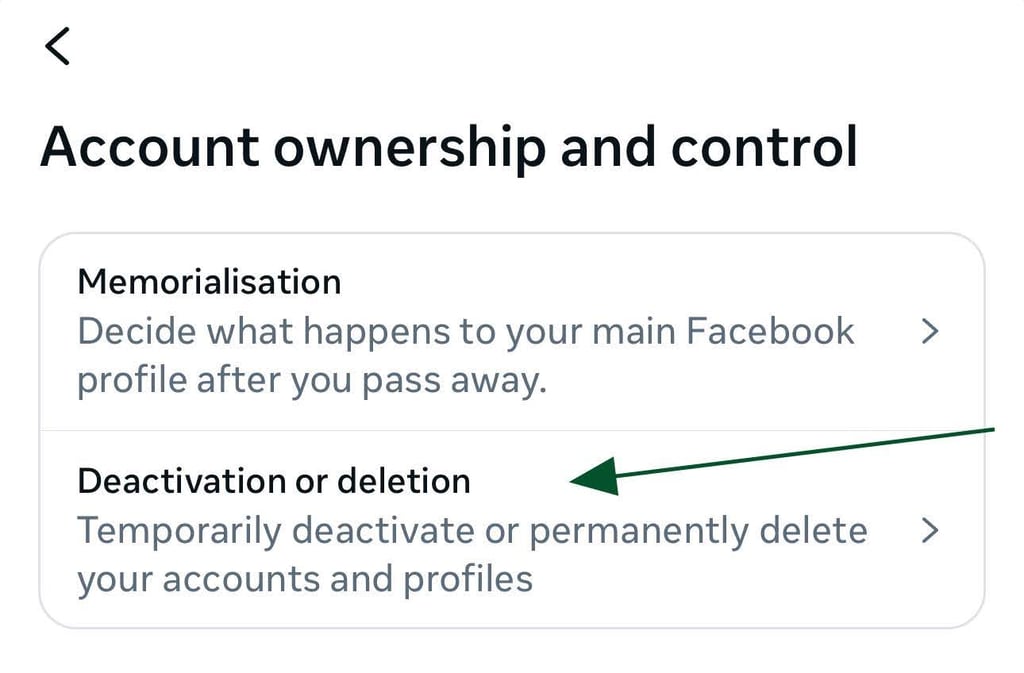
Select Account ownership and control

-
Click Deactivation or deletion

- Choose the account or profile you want to delete.
-
Select Delete account
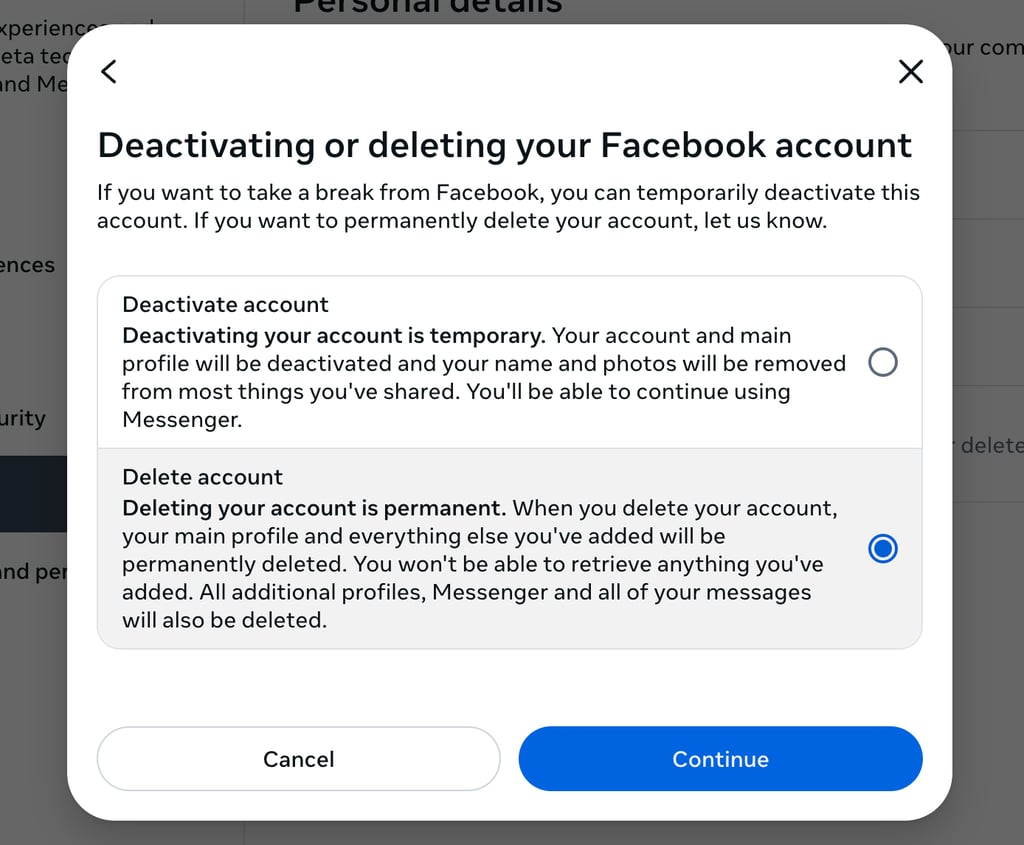
- Click Continue, then follow the instructions to confirm. You will be asked to select a reason and re-enter your password
Mobile app
If you’re on the Facebook mobile app on your Android or iPhone, the deletion steps are almost identical – with minor menu differences. Here’s what that looks like:
-
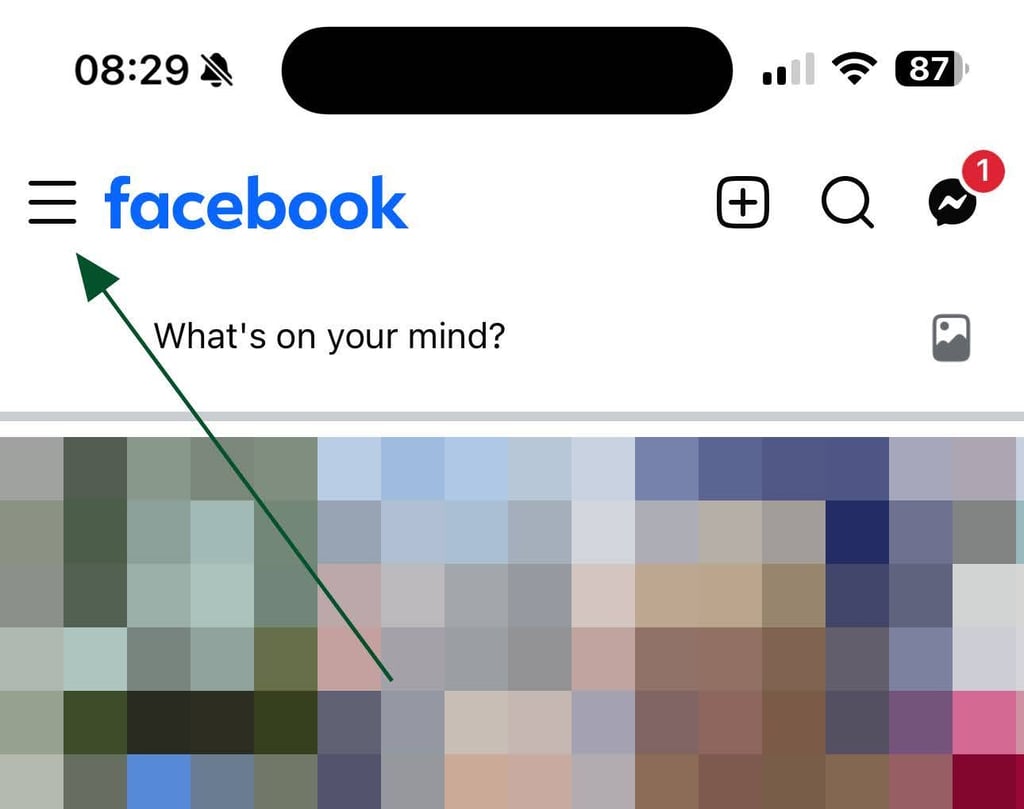
Open the Menu
-
Tap Settings & privacy, then tap Settings
-
Tap Accounts Centre. On iOS you may need to tap See more in the Accounts Centre first

-
Tap Personal details
-
Tap Account ownership and control

-
Select Deactivation or deletion
- Choose the profile you want to delete
-
Select Delete account, tap Continue
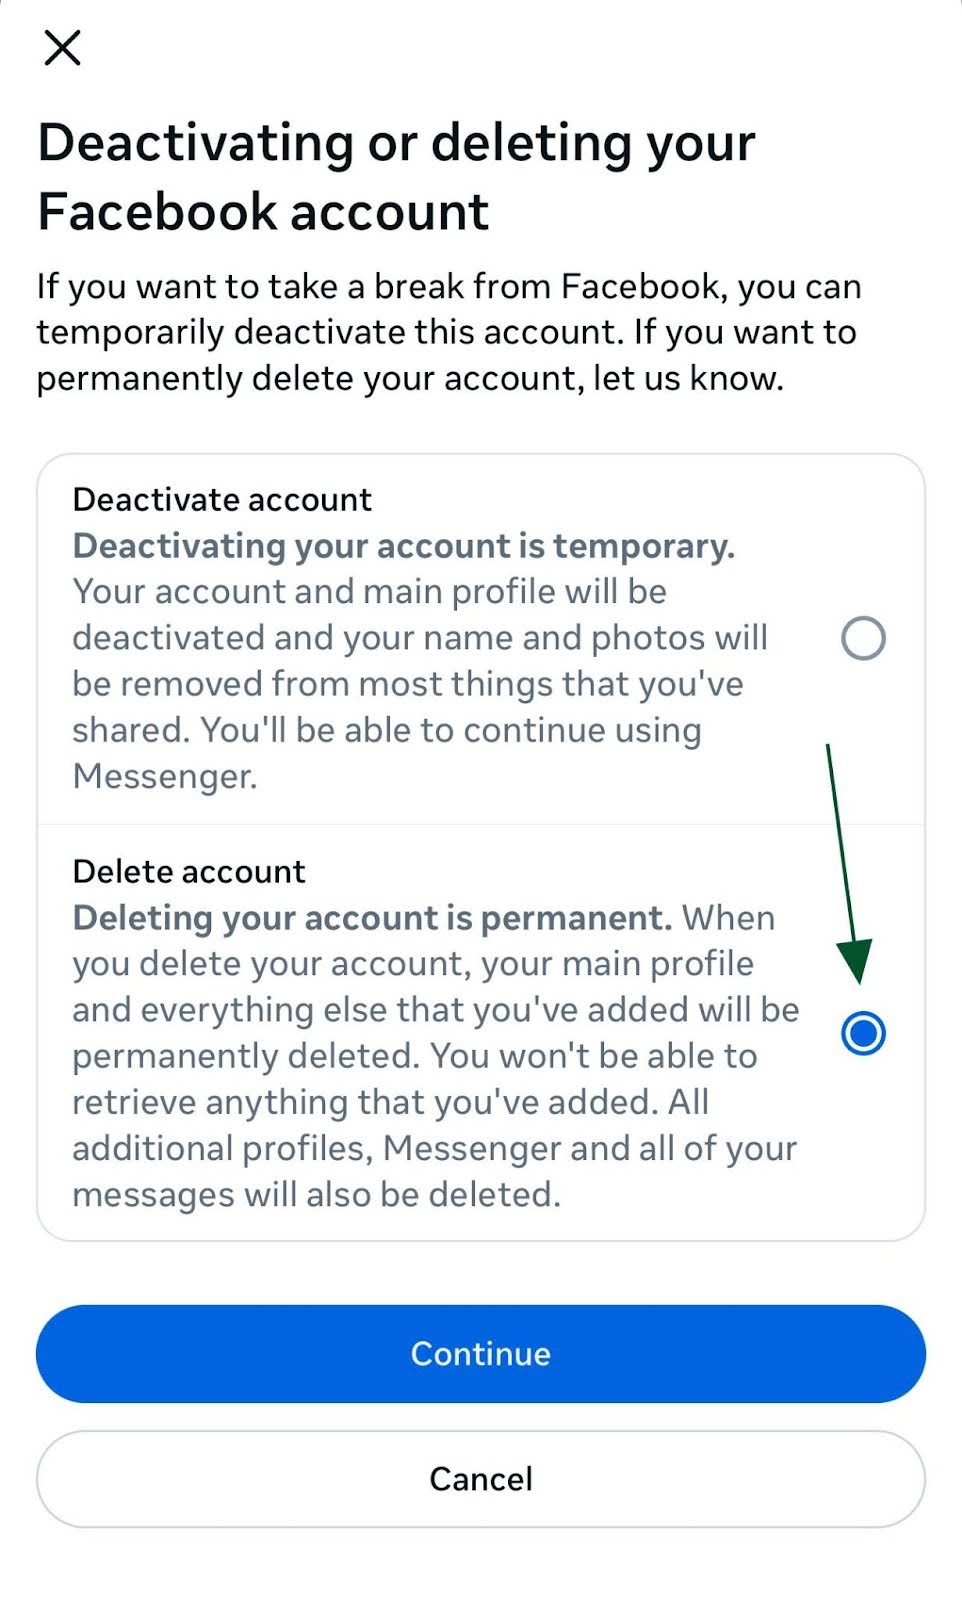
- Follow the instructions to confirm. You will be asked to select a reason and re-enter your password
Note: On iPad, Facebook only documents the Facebook settings method (Menu → Settings & privacy → Settings → Profile access and control → Deactivation and deletion → Delete account → Continue to account deletion).
Additionally, Facebook lists account deletion methods for the Facebook Lite app – a simplified version of the Facebook app made for low-end Android devices and slow internet connections.
In the Facebook Lite app, delete your account via the Accounts Centre by following the same steps as Android – with one extra step: tap See more in Accounts Centre before Personal details. For the Facebook settings method, however, you might need to log in from a computer to complete the process – depending on your app version.
Ultimately, the key to deleting your Facebook account is finding where the Accounts Centre is. If it’s not there, you use the Facebook settings fallback path. Once your delete request has gone through, Facebook will begin processing your request. In the next sections, I’ll explain what happens after you start deletion, what’s possible if you change your mind, and alternatives to deleting your account.
What happens after you request deletion?
After you confirm your deletion request, your account won’t be erased immediately. Instead, there’s a 30-day grace period where your account is inactive, but still recoverable. If you login again within that time period, you can cancel the deletion request and restore everything. After the 30 days, your account and all of the data you added – from photos and videos, to posts – are gone.
The full deletion process takes up to 90 days, as Facebook clears backups and server logs. During that time, others can’t access your data, but copies of it may still exist in system backups until Facebook wipes it all.
However, some data isn’t deleted. Messages you sent to friends will remain in their inboxes even after your account is gone. Also, deleting your Facebook account affects linked services like Instagram or Meta Quest. For instance, you won’t be able to use Facebook Messenger, and all of your Quest information will be deleted (app purchases, achievements, and store credits).
Can you cancel the deletion?
You can cancel the deletion, but only if it’s been less than 30 days since you submitted your deletion request. You can simply stop the process by logging back into Facebook and clicking Cancel deletion. This way, you instantly restore your account in its entirety.
However, after 30 days, cancellation is no longer an option. Your account and everything you’ve added are permanently erased. And even after the deletion process has started, Facebook may retain some of your data in backups for up to 90 days – or even longer for legal or security reasons.
Alternatives to deleting: deactivation and memorialization
If you want to take a break but not lose your profile, you can temporarily deactivate – your profile becomes hidden from others. Some details – like past messages, your name in friends’ lists, or group posts – may still be visible. You can reactivate anytime just by logging back in. If you keep Messenger active, you can still use it, but not Meta Quest.
Then there’s memorialization for the accounts of people who’ve passed away. Memorialized accounts stay visible to friends and family, and you can designate a legacy contact in advance to manage certain aspects of a memorialized profile.
Recommendations and privacy tips
Before leaving Facebook for good, it’s good practice to clean up your digital trail elsewhere:
- Check which apps you signed into with Facebook Login. Switch these to an email or standalone login otherwise you’ll lose access – or be forced to contact these platforms to regain access once your Facebook account is gone.
- Remove yourself from sites that trade your personal details. A service like Incogni can automate all of the tedious manual work for you.
On top of this, make sure to download a copy of your data – detailed at the beginning of this article.
Conclusion
Permanently erasing your Facebook account is a big decision, especially if you’ve been with the platform for many years. Alternatively, you can choose to temporarily deactivate your profile. However, if you’re shutting down, I’ve shown you how to do it effectively. Also, remember that not all data disappears – messages to friends, for example, might remain visible to them.
In short, back up your information before you leave, review your linked logins, and use privacy tools like Incogni that will sweep any lingering sensitive personal data from the internet. Take your time and proceed carefully.
Other guides from Cybernews:
How to delete your Instagram account
How to stop spam emails on iPhone
FAQ
Can I still use Messenger?
No, once you permanently delete your Facebook account (after the 30-day grace period), Messenger is gone. If you only deactivate, you can keep Messenger active and continue your chats. Facebook Messenger chats stay until you delete fully.
How long until deletion is final?
There’s a 30-day grace period where you can cancel deletion by simply logging back in. After that, the full removal process takes up to 90 days.
Does deleting Facebook delete Instagram too?
Not exactly, because even though Instagram belongs to Meta, it’s a separate account system. If your Instagram uses “Log in with Facebook”, set up an Instagram-only email or username first. Otherwise, you could lose access after deleting your Facebook account – and you may need to contact Instagram to regain access.
Why can’t I find the Delete account option on Facebook?
Facebook hides the Delete option in nested menus. Look under Accounts Centre or Settings & Privacy. If you don’t see “Delete account” directly, check Accounts Centre > Personal details > Account ownership and control > Deactivation or deletion. If you still can’t see it, look in Your Facebook Information.