How to use Squarespace: a masterclass for beginners (2026 edition)
Our team of experts and researchers rigorously test and evaluate website builders through transparent, in-depth testing procedures and methods using both in-house and industry-approved tools.
Drawing on cybersecurity insights, we provide unbiased, empirical rankings and analysis to help users make informed digital platform choices.
Learn more
Squarespace started as a simple portfolio builder, which has now grown into a full-scale website platform, powering everything from personal blogs to e-commerce stores and even enterprise-level sites. So, if you feel a bit intimidated about how to use it, I can understand you.
That's why, as a Cybernews expert, I worked together with our research team to review Squarespace’s own documentation, feature updates, and what users are saying about it online, especially around its newest editor. The biggest shift you’ll notice recently is the Fluid Engine.
At first glance, it can look overwhelming, particularly if you’ve never built a website before. But once you understand how it works, it’s also what makes Squarespace so flexible and visually polished. By the end of this guide, you’ll know exactly how to build a website on Squarespace and can confidently publish your own professional-looking site.
Phase 1: getting started and setup
When I researched how people begin using Squarespace, the same early friction points kept coming up: picking a template, understanding the free trial, and making sense of the dashboard. This is usually where beginners worry they might make a “wrong” decision, but in reality, Squarespace is far more forgiving than it first appears.
The setup process starts with choosing a template. Squarespace’s Fluid Engine editor has turned templates into flexible foundations rather than fixed designs. Layouts, sections, and visual styles can all be changed later, sometimes beyond recognition. It’s best to choose a template that roughly matches your goal – whether that’s a blog, service site, or online store, and move on without overthinking it.

Once your template is selected, you’re placed into a 14-day free trial. No credit card is required, which removes a lot of pressure for first-time users. This trial period is designed for exploration, giving you time to experiment with layouts, settings, and features before deciding whether to commit.
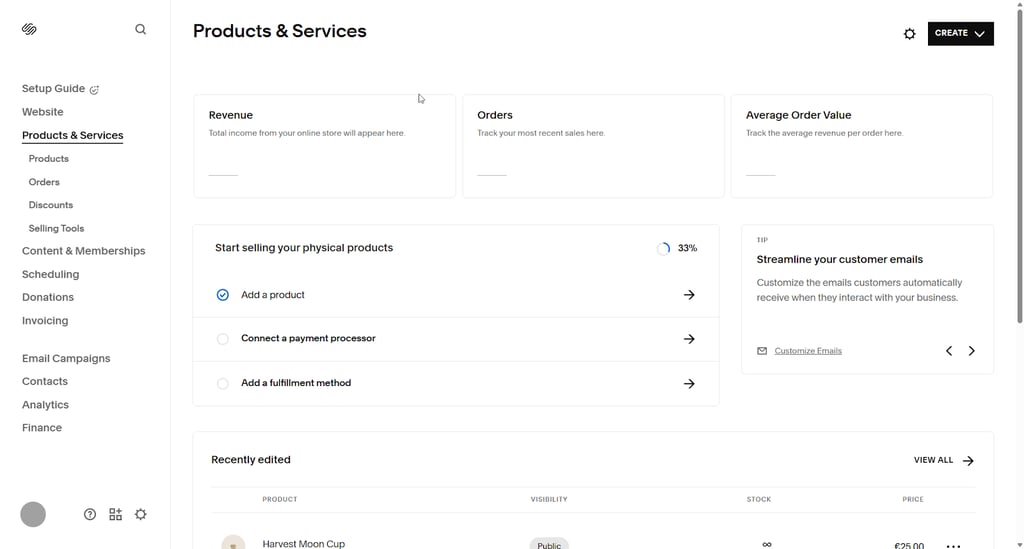
After that, you’ll land in the main dashboard, which acts as your control center. The left-hand sidebar is where most of your work will happen. "Pages" is where you create and organize your site structure, "Design" controls global fonts and colors, "Commerce" handles products and payments, and "Marketing" covers tools like email campaigns and SEO settings. Once these core areas feel familiar, the rest of the platform becomes much easier to navigate.
Phase 2: mastering the “Fluid Engine” editor
When beginners talk about struggling with Squarespace, they’re almost always talking about Fluid Engine. In my research with the Cybernews team, this editor came up as the main logical hurdle; not because it’s broken, but because it works differently from older drag-and-drop builders.
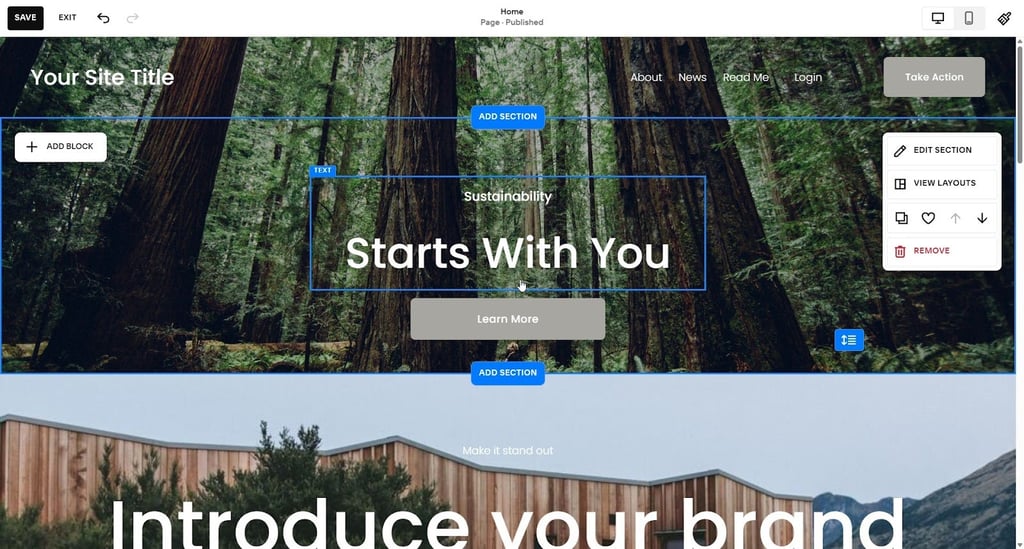
At its core, Fluid Engine is a grid-based editor. Every element you add snaps to an invisible grid, which helps keep layouts clean and aligned. You can resize blocks freely, move them side to side, and even layer content, such as placing text directly over an image.
Understanding the difference between sections and blocks is crucial here. A section is a horizontal strip that spans the width of the page. Inside each section, you place blocks (text, images, buttons, forms, or videos). You always add or move blocks within a section, not across the entire page freely.
One of the most common pain points I found is mobile editing. Fluid Engine does not automatically guarantee a perfect mobile layout. You must switch to the mobile view and adjust spacing, block sizes, or stacking manually. This is intentional and gives you control over how your site looks on smaller screens.
Phase 3: building your core pages
Once the editor basics are clear, you can build your core pages in a logical, repeatable process. Most beginner sites revolve around four essential page types.
- Creating your homepage and hero section. Start by opening “Pages” and selecting your homepage. The first section is usually the “hero” or the large area visitors see first. Add a section, insert an image or background, then layer text and a button on top using Fluid Engine’s grid. Keep this simple: a headline, a short value statement, and one clear call to action.
- Building an “About” page that tells your story. Next, add an About page. Instead of a long text block, use image layouts to guide your reader. Combine images and text blocks side by side to create a visual narrative. Explain who you are, what you do, and why it matters. This layout-driven storytelling is one of Squarespace’s strengths.
- Setting up a “Contact” page. Create a new page and add a form block. Squarespace forms can be connected directly to your email, stored in Google Drive, or sent to both. This ensures inquiries don’t get lost. Add only basic fields like name, email, and message to keep conversion friction low.
- Adding services or portfolio content. For repeatable content, use "Collection Lists." Create a collection for services or projects, then display them as a list or grid. This lets you update one item once and have it reflected everywhere.
Phase 4: design and styling (global styles)
This is the phase where a lot of beginners accidentally make their site harder to manage than it needs to be. From what I found while reviewing Squarespace’s own guidance and user feedback, the biggest mistake is styling pages one by one instead of setting things up globally first.
Everything starts with the “Site Styles” icon, the small paintbrush you’ll see while editing. This is where Squarespace expects you to make your main design decisions. When you click it, you’re not editing a single page; you’re defining how your entire site behaves visually.
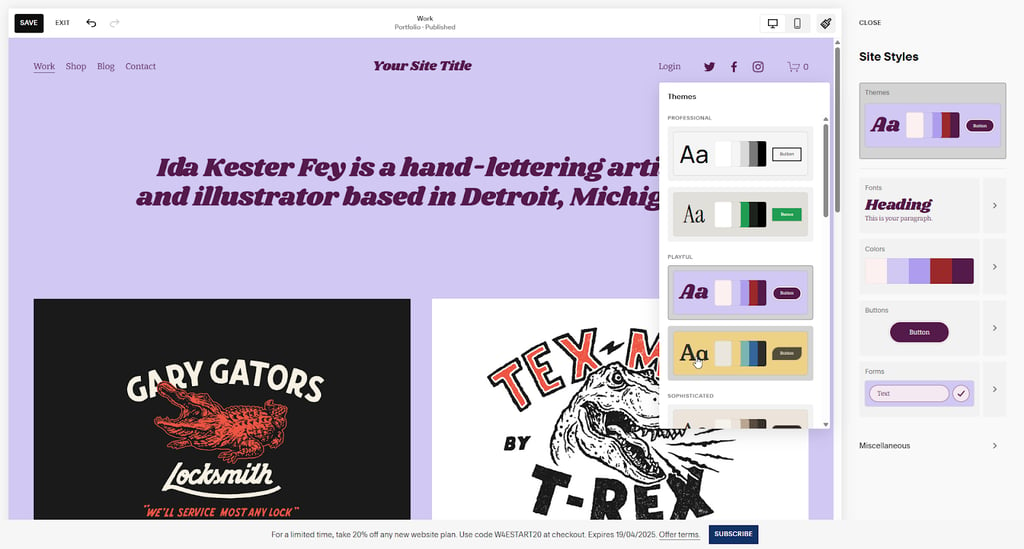
The most important thing to do here is set your fonts and colors before touching individual pages. Fonts are handled through pre-built Font Packs, which combine headings, body text, buttons, and spacing into a cohesive system. You can swap packs instantly and see the entire site update in real time. This approach keeps typography consistent, even if you later add new pages or sections.
Colors work the same way. Instead of manually picking colors for every element, Squarespace uses Color Palettes. A palette controls background colors, text contrast, and accent elements across the site. Changing one palette can completely refresh the look without breaking layouts.
Only after fonts and colors are set globally does it make sense to fine-tune individual sections. At that point, small tweaks feel intentional rather than messy. This global-first system is one of the reasons sites built with Squarespace tend to look polished, even when created by beginners.
Phase 5: setting up e-commerce (if applicable)
If you plan to sell anything on your site, it can help you to approach Squarespace’s e-commerce tools in the order they’re designed to be used. Doing it this way keeps the setup straightforward and avoids that you miss important settings later on.
-
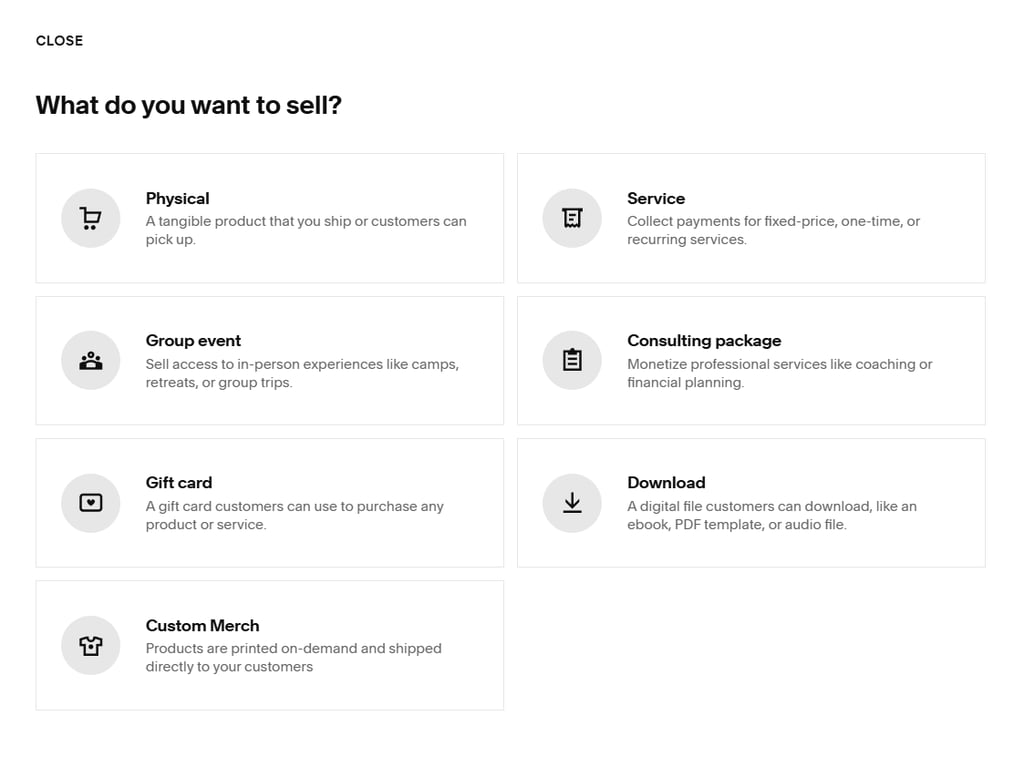
Start by adding a product. Open the dashboard, go to "Commerce," and choose "Products." From there, select "Add Product" to begin. This is where every sale on your site ultimately starts.

-
Choose the correct product type. Squarespace will immediately ask whether the product you want to sell is physical, digital, or a service. Physical products open up shipping and inventory options, digital products focus on file delivery, and services are structured around bookings or custom fulfillment. Changing this later can be inconvenient, so it’s worth pausing here.

-
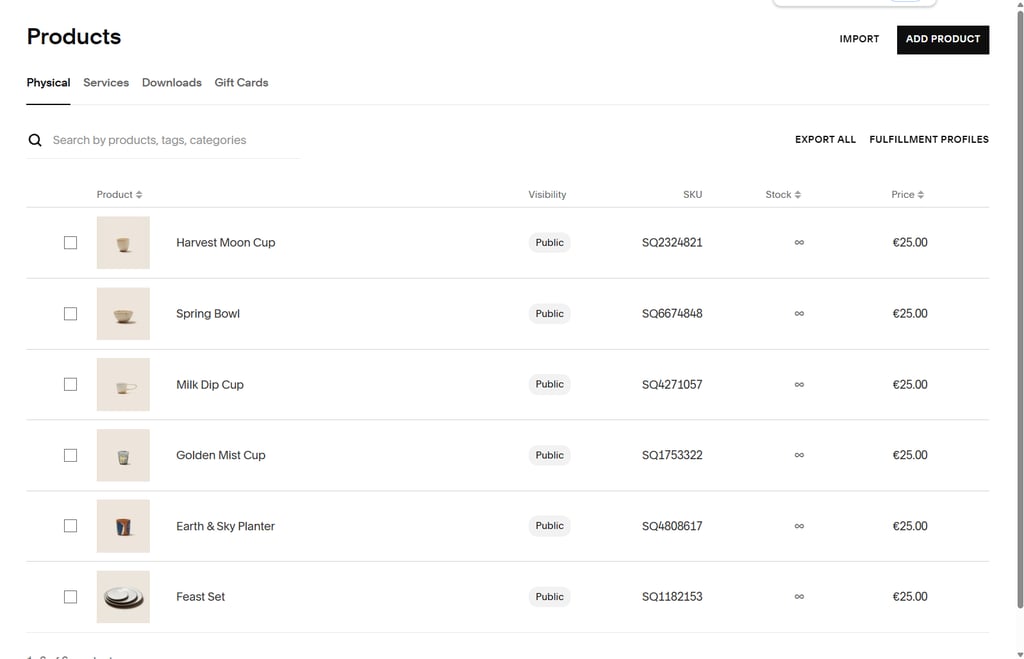
Complete the product details. Once inside the product editor, you can add a title, description, price, and images. The layout should feel familiar to you if you’ve already worked with pages and blocks. For physical products, you can also set your inventory details, while digital products typically include a file upload.

- Connect your payment methods. Next, you should head to "Commerce" and open the "Payments" section. Squarespace supports Stripe and PayPal, and connecting either usually means that you have to sign in and approve access. Stripe handles your card payments, while PayPal gives customers another checkout option.
- Set up shipping if needed. If you’re selling physical products, open the "Shipping settings." You can choose a flat rate if your pricing is simple or you can enable calculated shipping based on weight and destination. Many beginners start with flat rates and adjust once orders start coming in.
Phase 6: SEO and marketing essentials
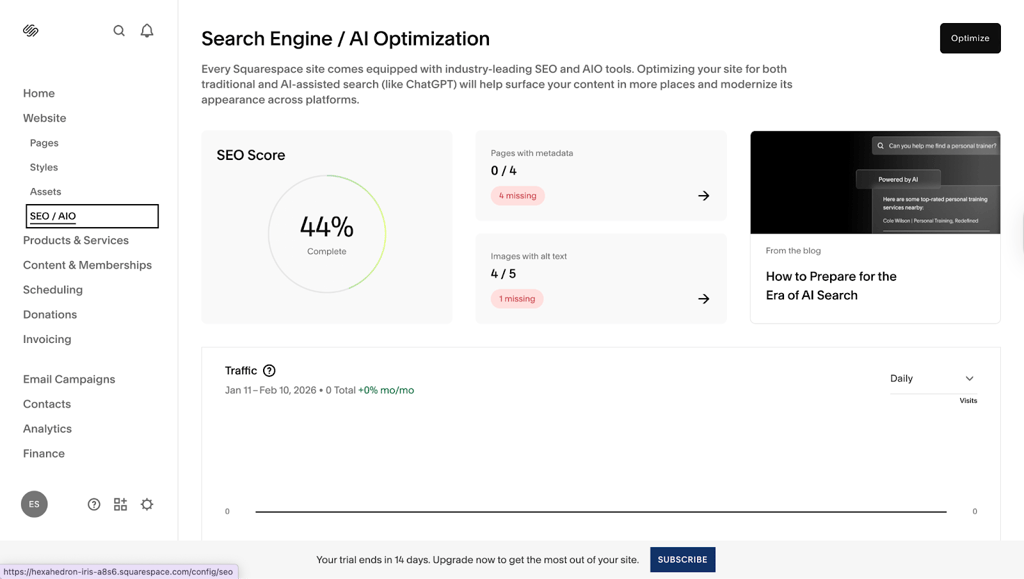
One thing I kept seeing while researching Squarespace is the same tired claim that it’s “bad for SEO.” That idea doesn’t really hold up. Squarespace takes care of many of the technical fundamentals automatically, such as secure connections, clean page structure, and mobile optimization. Where SEO actually succeeds or fails is in the details users control, and that’s where beginners often fall short.
Most of the important SEO work happens quietly, page by page. Each page has space for a title and meta description, and those fields directly affect how your site appears in search results. They’re easy to skip because nothing breaks if you leave them blank, but filling them out thoughtfully makes a difference over time. Images deserve attention too. Adding alt text isn’t just an accessibility checkbox; it helps search engines understand what your content is about.
On the marketing side, Squarespace keeps things intentionally contained. Instead of pushing users toward plugins, it offers built-in email campaigns and pop-ups. These tools are basic by design, but that’s also their strength. Email campaigns work well for announcements or updates, and pop-ups can collect sign-ups or highlight offers without much setup.
Analytics are where everything starts to connect. The Traffic Sources report shows how people are finding your site, whether through search, direct visits, or referrals. You don’t need to analyze every chart. Looking for steady trends tells you far more than chasing short-term spikes.
Phase 7: going live
Going live is usually the most nerve-racking part, even though the actual steps are fairly simple. From what I saw while reviewing Squarespace and its user experiences, most hesitation at this stage comes down to domains and plans rather than the site itself.
The first decision is your domain. You can buy one directly through Squarespace or connect a domain you already own from a third-party registrar like GoDaddy or Namecheap. Buying through Squarespace is the easiest route. The setup is automatic, and many plans include the first year free. Using a third-party domain works just as well, but it involves changing DNS records manually, which can feel intimidating if you’ve never done it before.
Next comes the plan upgrade. Until now, you’ve been working inside the free trial. To publish, you’ll need to choose a paid plan. For most beginners, the difference comes down to Personal versus Business. Personal is fine for basic sites, but Business unlocks features like custom CSS, advanced analytics, and full e-commerce tools.
Once the domain is connected and the plan is upgraded, publishing is anticlimactic — in a good way. There’s no dramatic launch sequence. You click publish, Squarespace removes the trial banner, and your site is live.
FAQ
Is Squarespace harder than Wix?
Yes, Squarespace has a slightly steeper learning curve. Wix lets you drag almost anything anywhere, which feels easier at first. Squarespace is more structured, hence harder to learn. But that structure usually helps beginners avoid layouts that look cluttered or accidentally break later.
Can I use my own domain with Squarespace?
Yes. You can connect a domain you already own from third-party providers like GoDaddy or Namecheap, or buy one directly through Squarespace. Buying through Squarespace is simpler, and the first year is often included with annual plans.
What is Fluid Engine?
Fluid Engine is Squarespace’s current page editor. It works on a grid and lets you move, resize, and overlap elements more freely than before, while still keeping everything aligned and responsive across different screen sizes.
Do I need to know code?
No, most Squarespace sites are built without touching code at all. Custom CSS exists, but it’s optional and usually only needed for very specific visual tweaks, not for building or managing the site.
How do I get help if I’m stuck?
Squarespace offers a 24/7 live chat and email support. There’s also a large help center with written guides and videos that cover most features and common problems in plain language.