How to make your own VPN server
Our in-house cybersecurity experts and journalists, renowned for major reports like The Mother of All Breaches, conduct transparent, unbiased VPN testing and in-depth analysis.
With 750+ articles crafted based on real-world research, we empower readers to make informed purchasing decisions through first-hand expertise.
Learn more
If you want to secure your data on public Wi-Fi and access your devices remotely without relying on a commercial VPN provider, it’s time to learn how to make your own VPN server.
When you use a commercial VPN, you trust the provider with your web traffic. On the contrary, when you host your own server (whether on cloud or your home router), you take control over how your data is routed. While a custom VPN won't provide the absolute anonymity of a commercial service, there are some unique benefits to setting one up. For one, you won’t have to worry about the VPN logging your data. Plus, you will be able to access your home network from anywhere in the world.
If you’ve never tried setting up a VPN server yourself, the process might seem a bit intimidating, but rest assured that it’s easier than you think. With this guide, I walk you through hosting options, discuss the realistic trade-offs of a self-managed VPN server, and provide step-by-step instructions for both cloud and router setups.
However, building your own server takes time and knowledge. If that's not for you, the Privacy Hero II from FlashRouters offers a middle ground. It's a home router you control, but with NordVPN already built in and configured automatically during activation.
You get a free year of NordVPN, plus NordLynx and WireGuard support for speeds close to your original connection. On top of that, there's ad and malware blocking, parental controls, and streaming relocation, all managed from one simple dashboard.
Why create your own VPN?
With such a wide range of VPN services already available, setting up your own server might seem like a waste of time. However, there are quite a few advantages to the DIY approach:
- Fewer points of trust. With a paid VPN service, you pass all of your traffic through a third-party service operator and its cloud or network provider. When you set up your own server, you cut out the middleman, so your data remains private between you and your host.
- Lower cost and fewer limitations. In exchange for time setting up and being limited to a single region, making your own VPN server is cheap. Some cloud providers even offer fully-functional server hosting for free or provide significant sign-up credits. If you have a compatible router, setting up a VPN server can be even cheaper. While you don’t need to worry about a monthly subscription, you may need to upgrade to a router with built-in VPN capabilities or pay your ISP for a public IP address.
- Access to your home network. If you set up your VPN server on your home router instead of in the cloud, you’ll be able to use your home connection. From printing on your personal printer to accessing files on your NAS, most of the IP-reachable devices and services on your home network will work while connected to the VPN. You can travel and still have access to your digital resources at home.
- A good learning experience. Although you can set up your own VPN with relatively little technical knowledge, the process will introduce you to lots of concepts and technologies that are common in IT. So, you will not only gain the server you need but also great experience.
Are there any disadvantages?
While setting up your own VPN server can be extremely beneficial, there are some situations when this idea might be a poor choice:
- If you use a VPN to access region-locked content around the globe, you need servers in different countries. In this case, a homemade VPN server is inferior.
- If you aren’t willing to dedicate the time to set it up, I don’t recommend the DIY route. While modern tools have made the process easier, there’s no doubt that setting up a VPN isn’t for everyone.
- If you don’t want to be responsible for security, keep in mind that when you set up your own VPN server, you will need to secure it. You’ll need to make informed decisions on security-related issues, which can be an extra burden.
Setting up your own VPN server
To create your own VPN for personal use, you have a few specific hosting options:
- Running the software on a cloud virtual private server. All cloud providers, from titans like Amazon Web Services to smaller operations like Vultr, offer cloud-hosted servers called VPS. This approach allows you to select a city with a data center in which to host your VPN.
- Using your home router’s VPN server functionality. If you have a router with the feature built-in or with the ability to use third-party firmware, you only need your router. With this approach, you can access your home network remotely. At the same time, this option isn’t useful while at home.
- Hosting on dedicated physical machines. Enterprises commonly have dedicated VPN servers on their internal networks to allow employees to securely work from home. For home use, this solution is an overkill: your router can do the same thing. However, you could have a second network that you want to access remotely (e.g., for remote tech support at an older relative’s house). In this case, you can follow many of the same steps for creating a cloud VPN server but with a spare desktop or single-board computer left on 24/7.
In the following sections, you’ll learn how to set up a VPN in the cloud and on a router.
Create your own VPN in the cloud
- Choose a cloud platform. Since all we need is a virtual private server (VPS), nearly any provider will work. For the purposes of this guide, I’m using the Google Cloud Platform. It offers a $300 free trial credit for the first 90 days to new customers and some convenient beginner-friendly features. However, nearly every step works with AWS, Azure, or smaller providers.
- Sign up and claim any applicable credits. For GCP, you need a valid credit or debit card to verify that you’re a unique human, although you won’t be charged.
- Activate Cloud Shell. Open Google Cloud Shell in the upper-right corner of Cloud Console. You’ll use Cloud Shell as a remote environment to provision your virtual machine.

- Download Algo. Using the Git version control system, download Algo (a suite of VPN setup tools) into your Cloud Shell. Type git clone https://github.com/trailofbits/algo.git and press Enter. This command downloads Algo and unpacks it into a new folder. Use cd algo to change directories into where Algo was downloaded.

- Create a project and service account to house the resources needed for the VPN server by executing each of the following commands. Type and Enter each command separately, unless it ends with \ at the end – in this case, enter all connected commands as a single block:
- PROJECT_ID=${USER}-algo-vpn
- BILLING_ID="$(gcloud beta billing accounts list --format="value(ACCOUNT_ID)")"
- gcloud projects create ${PROJECT_ID} --name algo-vpn --set-as-default
- gcloud beta billing projects link ${PROJECT_ID} --billing-account ${BILLING_ID}
- gcloud iam service-accounts create algo-vpn --display-name "Algo VPN"
- gcloud iam service-accounts keys create configs/gce.json \
- --iam-account algo-vpn@${PROJECT_ID}.iam.gserviceaccount.com
- gcloud projects add-iam-policy-binding ${PROJECT_ID} \
- --member serviceAccount:algo-vpn@${PROJECT_ID}.iam.gserviceaccount.com \
- --role roles/compute.admin
- gcloud projects add-iam-policy-binding ${PROJECT_ID} \
- --member serviceAccount:algo-vpn@${PROJECT_ID}.iam.gserviceaccount.com \
- --role roles/iam.serviceAccountUser
- gcloud services enable compute.googleapis.com
- Edit Algo’s configuration. Use the nano text editor (or another editor like vim, if you know how to use it) to edit Algo’s configuration. Type nano config.cfg and press Enter.

- Most of the time, the default options will suffice. That said, read all of the comments up until the advanced section to make sure that the choices make sense for your situation.
- Pay special attention to the users you set up initially. Keep in mind that you won't be able to easily add more users after your server is running, so take your time to create the necessary user accounts now. If you know you’ll want to add more users later, be sure to select Yes when you receive a prompt asking “Do you want to retain the keys (PKI)?”
- Save and exit by pressing control-X, followed by Y (yes, I want to save), followed by Enter.
- Enter ./algo -e "provider=gce" -e "gce_credentials_file=$(pwd)/configs/gce.json" (this command will start the setup wizard).
- Choose a name for the server. The default, “algo”, is fine. However, you can come up with any name you want.
- Enable “Connect on Demand” on iOS devices and Macs. This feature allows you to automatically use a VPN whenever you’re connected to the internet. It can be a hassle for some use cases, so it’s disabled by default. You’ll need to make the choice twice: for cellular networks and for Wi-Fi.
- Choose whether you want automatic ad blocking. You can enable automatic ad blocking while connected to the VPN.
- Disable SSH tunneling. If you won’t use this feature, or you don’t even know what it is, choose “No” for the next option.
- Choose the region. You will now need to choose the region where you’d like your VPN server to be hosted.
If everything works according to plan, you’ve just created your own VPN – congratulations! Once Algo has completed, you will need to quickly download a copy of the configuration files to your local system.
While still in the Algo directory, run the following commands:
- zip -r configs configs
- dl configs.zip
Then, unzip configs.zip on your local system and use the files to configure your VPN clients.
How to set up your own VPN on your router
No two routers have the same firmware with all the same options, so it’s hard to provide universal steps. Follow the list below as general guidelines:
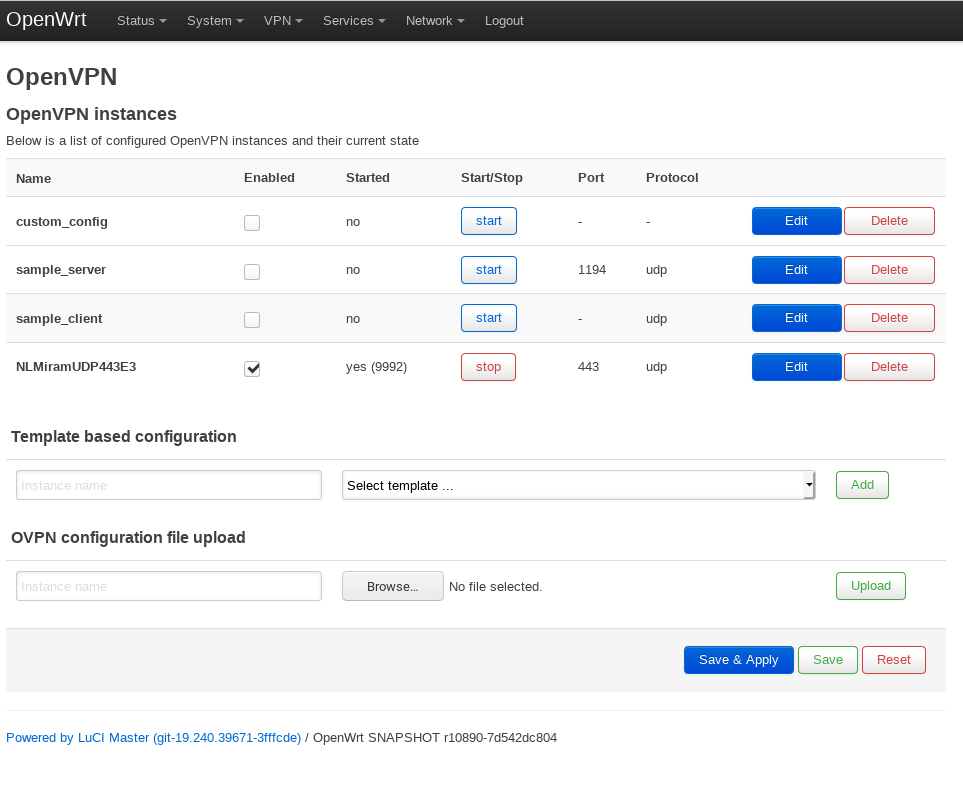
- Type [your router’s model] VPN server into Google Search. If your router supports this out of the box, you’ll likely find a guide with further instructions. If not, see if your router is compatible with third-party firmware like OpenWrt (note that flashing third-party firmware can void warranty or even brick the router if not done correctly). Of course, most routers can’t create VPN servers. In this case, you’ll need to try another approach like a cloud-hosted server.
- Open your router’s configuration page, usually at the first IP address in your internal network. Try 192.168.0.1 and 10.0.0.1 in your web browser.
- Enter the Administrator password for your router, which you can usually find on the physical router.
-
Find the correct page with VPN configurations and create a server. Follow your router or firmware’s instructions to set the correct options.

For more information, read our full how to install a VPN on your router guide.
Connecting to your own VPN server
Now you’re done with the hard part of setting up your VPN server. From here on out, the process is somewhat similar to using a commercial VPN provider.
If you set up a VPN server in the cloud with Algo, follow the official instructions to connect using your devices. It’s usually as simple as installing an app and scanning a QR code, which can be found in the configs.zip folder.
Connecting to your router’s VPN depends on the tunneling protocol you’ve used. For example, if you opted for OpenVPN, you’ll need to install the OpenVPN client app on your client device and import the .ovpn configuration profile. Depending on your router’s setup, you may also need a username, password, certificate, or key file.